Yes, it's true, Ventura is now in somebody else's hands. In a fit of feeling overwhelmed by all the STUFF I have, (8 boats) I put Ventura up for sale. Just over 24 hours later she gone. Weird.
I don't agree with the saying that the two best days for any sailor are first, the day he buys his boat, then second, the day he sells it. It was not a great day or feeling to see the boat being driven away on it's trailer. We went thru a bit together in a short time. Each of us came close to ending our days. It was a rough day for both of us, but we each returned to the water and are here still. We each have a good story to tell from it.
I think that some young boys are going to be the new captains of Ventura, there fathers will be crew. I never got her name painted on, only penciled in, and I kind of hope the boys pick a name for her that makes the boat even more their own, though I do think that VENTURA is a pretty great name.
Now what?
Sail the skiff? Paddle the kayaks? Row the pram? Get the Bristol in order and launch her? That sounds almost too good to be true. It has been so long, too long since I have sailed that boat. She really is the boat. She got me thru some allot.
Well what ever is next, as long as it's 'messing about' it should be good.
Best wishes and fair winds to the new owners of VENTURA.
Showing posts with label fiberglass sailboat. Show all posts
Showing posts with label fiberglass sailboat. Show all posts
Friday, July 10, 2015

Wednesday, June 24, 2015
The first week of summer
The summer solstice was just a few days ago and today, after 14 months since the knock down, Ventura sailed once again!

It was a very nice day though I could have used just a touch less wind, but in the end it was just fine. Trying to get this rig back together and sort out everything is tedious and time consuming. One really needs to be happy just "messing about" in boats with a trailer sailor because so much time is spent getting the boat to the water and ready to go, then doing the reverse at the end of the day.
Our sail was only about 2 hours, but it was enough time to take the boat thru it's paces. We raised both main and jib. We reefed the main. We tacked. We jibed. We docked and we used the motor. It is all working again. The only thing we didn't really do was anchor.
I have along "to do list" after the sail. Mostly things I forgot, some important, some not so much. I forgot to put on the rigging for the reef point, that was very annoying. I made it work with spare line onboard, but heavily chastised myself for not thinking it all thru.
The out board was a bit inconsistent as we left the dock and eventually died, but we had decent wind so we just sailed. On the return I ran it for a while and it eventually evened out and ran the entire time we needed it. This was the first time it has really run since it was IN the river. I did maintenance it after it's sinking but hadn't really run it very long since. I think it will be fine.
In truth my enthusiasm for this kind of boat, this kind of sailing isn't very strong. I miss my full keeled cruiser on it's mooring. But I will make due with what I have right now.
It was good to be back on the water and even sailing with in sight of where I took my very cold swim, the one that was almost the last thing I ever did, was fine. I really only gave it a thought for about 2 seconds, maybe 3.
There is a lot of summer ahead. Todays sail only cost 10 dollars at the launch ramp. I have to do quite a few of those to equal the cost of a slip for the summer, so that makes spending the 10 bucks a lot easier. Let's see what the summer has in store for us.
Fair Winds!
Although I am thinking of having a new mainsail built for Ventura and using her as much as I can I will say that if anybody needs a very, very cheap boat and trailer I am open to selling her. I have too many boats right now and I really miss sailing my Bristol
Thursday, June 4, 2015
sails
I know that there is something elemental missing from these photo's, like water, but one step at a time. Presenting the Venture 21s. "S" stands for short rig.
 |
| Formerly the staysail, now the jib. Kinda small but it'll work |
 |
| The shortened main sail. Always was short along the foot. The sail actually has roach to the leech but I don't have the battens in. |
 |
| Cut and pasted jib, from the first photo into the second and now we have all working sail up. |
It's not a lot of canvas but I ain't racing and at this point in my experience with this boat, I'd rather be under canvased. (Wink, wink, nod, nod). I hope to be in the water next week. Before the equinox would be nice.
My rigging measurements were good
 |
| New rigging copper swaged eyes, slathered in lanolin and covered in heat shrink tubbing. Workboat handsome, or industrially cute? |
It was a breezy day so not only was I wishing that I was launching, but I also had to be careful about raising sails while the boat was on the trailer, which I did to see how things fit.
The small jib which was the staysail is truly small, but, it fits nicely on the forestay. I have yet to alter the jib and genny to fit the new rig measures.
I also set the main, which was much easier for the topping lift that I added to the boom, but still awkward as the mast is really designed to have the luff, as well as the foot of the mainsail in the groove. This main has the roping on it to set it this way but lugs have been put along the luff. I'm not sure why this was done and only realized this now after owning the boat for a year and a half. Duh!
Anyway, the mainsail's new height is good. I may end up with a lot of chafe as the leach passes under the back stay and the topping lift.
I took pictures but my phone is having issues sending them to the computer.(piece 'o' shite!) I'll add them later.
I will say again that it is so much easier to raise this mast now. I suppose that the 15% of length that is no longer out at the end of it makes a lot of difference.
I'm not sure what is next, maybe launching her and sailing. There is a thought! It's been a while.
Thursday, May 21, 2015
Main's done
I got the main all put together and it came out pretty good, I think. I hand stitched the new patches and used aluminum pop rivets for the head board (I reused the old head board) and then pounded in a grommet for the halyard to attach to.
I did have to put 4 of the sail slides back on but I used 3 of the old ones and one new one I had lying around. I put in on the mast, as the mast is by the shop on saw horses and it seems to fit just fine.
Now on to the jib that has a torn out clew. I think I will add a patch and then a roped grommet for the sheets to tie to.
Memorial day is this coming weekend, unofficial boat season beginning. I have no intention of being on the water this weekend because it is usually madness. This also means I am in no rush to get these projects done other than needing to move on to others in the shop, oh yah, and I'd like to go sailing again someday.
 |
| Re-cut. shorter, stronger.... and hand stitched |
Now on to the jib that has a torn out clew. I think I will add a patch and then a roped grommet for the sheets to tie to.
Memorial day is this coming weekend, unofficial boat season beginning. I have no intention of being on the water this weekend because it is usually madness. This also means I am in no rush to get these projects done other than needing to move on to others in the shop, oh yah, and I'd like to go sailing again someday.
Monday, May 11, 2015
Re-cut the sails for "short rig"
The Venture 21 was considered a pretty quick boat in it's day. It certainly seemed to move thru the water easily when I started sailing Ventura, even though the main sail was not the original, and about a foot and a half shorter along the foot, and two feet on the luff. Now with the mast being about 3 feet shorter from the damage and the repair, the sails a little bit tall.
I am cutting the mainsail down by about a foot, and I need to loose about a foot and a half off of the jib and genny. The staysail will continue to work as is if I fly it on the forestay in heavy weather, as I did before because the boat didn't have a inner stay rigged as was the original sail plan. I will in fact rig an inner stay so as to assist the new rig. I hope to set is up in the fashion of a running back stay so that it can easily be set and slacked for tacking. It's an idea.
In re-rigging the boat I have had to raise and lower the shorter mast a few times and the few feet of lost length has made the job very much easier. Yahoooo! I am not overly concerned about the lost sail area. On the main sail the loss will come from the head of the sail, a portion of the sail that has very little drive or area.
The jib and genny are a bit of a different story. I don't really want to just lop off their tops, so I am considering putting a grommet for the tack up a foot and a half from the original and adding reefing nettles, and continue to use the original clue. The sails could always stay "reefed" but the original area would be preserved. Why I want to do this I am not really sure. Partly because I am concerned about getting a good shape of the head sail if I recut it.
It is good weather for sitting in the shop with the big doors open and hand stitching the sails. It is better weather for actually being sailing. All things in their time.
I found that a sail maker I have used before would build me a brandy new main sail for under $500, including shipping. It is VERY tempting, but mostly because I am lazy. The old main never set very well, was blown out and old, but, I do own it already and this boat is about spending NO money(which I have failed at, but it is a boat so I can't be to hard on myself can I). If after launching the boat seems to have a good place in my life then I might splurge and order a new main someday. For now it is snip, snip, stitch, stitch.
If I ever do order the new main I think I will have the change the insignia from V21, to V21s, to signify the short rig.
I am cutting the mainsail down by about a foot, and I need to loose about a foot and a half off of the jib and genny. The staysail will continue to work as is if I fly it on the forestay in heavy weather, as I did before because the boat didn't have a inner stay rigged as was the original sail plan. I will in fact rig an inner stay so as to assist the new rig. I hope to set is up in the fashion of a running back stay so that it can easily be set and slacked for tacking. It's an idea.
 |
| Old main, cut down, patch to be added, reused headboard |
The jib and genny are a bit of a different story. I don't really want to just lop off their tops, so I am considering putting a grommet for the tack up a foot and a half from the original and adding reefing nettles, and continue to use the original clue. The sails could always stay "reefed" but the original area would be preserved. Why I want to do this I am not really sure. Partly because I am concerned about getting a good shape of the head sail if I recut it.
It is good weather for sitting in the shop with the big doors open and hand stitching the sails. It is better weather for actually being sailing. All things in their time.
I found that a sail maker I have used before would build me a brandy new main sail for under $500, including shipping. It is VERY tempting, but mostly because I am lazy. The old main never set very well, was blown out and old, but, I do own it already and this boat is about spending NO money(which I have failed at, but it is a boat so I can't be to hard on myself can I). If after launching the boat seems to have a good place in my life then I might splurge and order a new main someday. For now it is snip, snip, stitch, stitch.
If I ever do order the new main I think I will have the change the insignia from V21, to V21s, to signify the short rig.
"New" Standing rigging
My new standing rigging is finished! After much research, and a bit of stepping back to look at the big picture, I decided to go with the "nico-press" type of fittings because it was inexpensive, I could to the work myself, I didn't need expensive new tools or machines, and I could reuse a bit of the material I already had. I fully realize that many might be critical of the use of this type of fitting, and I might be to, if I were setting up a boat bound for open water or even strong weather, but in this case the boat is to be used for recreational, fair weather sailing, and having "made" the rig myself, I will be more mindful, and aware of the conditions of both the rig and the weather.
Had I been using this rig a year ago, I might have been more conservative about what I put the boat thru, decided to quit sooner, or not gone out at all, and saved my self the experience of being very, very cold and wet. (on the good side, I now know what that is like. Ignorance can breed fear, and knowledge allows for better judgement, I hope)
Some info on this rigging technique:
-1x19 S.S. doesn't want to bend the short radius of the thimbles. It seems that the sharp bend may compromise some of the strength of the rig.
-1x19 S.S. requires 2 copper sleeves, each swaged 3 times along their length.
-I made sure that the sleeves did not actually touch the thimble, or each other. I did this to promote a full compression of each swage.
-The end of the SS wire stuck out of the lower swage, but was covered by the heat shrink tubing. Before the tubing was applied the entire fitting was slathered in anhydrous Lanolin for protection.
-I used a swaging tool that uses 2 bolts, tightened down to compress the copper sleeves. This tool was the least expensive(a priority in this boat), smallest (so that in the future it can be kept on board my larger boat for emergency rigging), and it was simple.
- I checked the swages with a micro meter to see if they fell in the specs that I found on a forum thread about home built airplanes and this type of rigging. the tool was pretty consistent with the thickness of the finished swage and that dimension collaborated with the aviation specs.
I believe that Brian Toss mentioned that most of the boats he'd seen rigged in this way were in the UK. He didn't recommend these fittings very highly and seemed to think they were the wrong "tool for the job". I wouldn't disagree with him ultimately, but, I think that they will serve fine in this application. Most of the negative comments I found on the forums about pressed copper sleeves seemed to be about the way the finished fitting looked. I actually like the work boat kind of look they have. It is even more attractive because the look reflects that I did the work myself.
Using this tool with these parts required really taking my time setting up and making each swage, three for each sleeve, two sleeves for each eye, two eyes per stay, six stays, plus a few practice sleeves. I have to enjoy each moment of the work or I will rush to be done and botch the job.
Now on to recutting the sails.
 |
| SS thimble, 2-Swaged copper sleeves on lower shrouds coated with anhydrous lanolin, then covered in shrink wrap tubing |
-1x19 S.S. doesn't want to bend the short radius of the thimbles. It seems that the sharp bend may compromise some of the strength of the rig.
-1x19 S.S. requires 2 copper sleeves, each swaged 3 times along their length.
-I made sure that the sleeves did not actually touch the thimble, or each other. I did this to promote a full compression of each swage.
-The end of the SS wire stuck out of the lower swage, but was covered by the heat shrink tubing. Before the tubing was applied the entire fitting was slathered in anhydrous Lanolin for protection.
-I used a swaging tool that uses 2 bolts, tightened down to compress the copper sleeves. This tool was the least expensive(a priority in this boat), smallest (so that in the future it can be kept on board my larger boat for emergency rigging), and it was simple.
- I checked the swages with a micro meter to see if they fell in the specs that I found on a forum thread about home built airplanes and this type of rigging. the tool was pretty consistent with the thickness of the finished swage and that dimension collaborated with the aviation specs.
I believe that Brian Toss mentioned that most of the boats he'd seen rigged in this way were in the UK. He didn't recommend these fittings very highly and seemed to think they were the wrong "tool for the job". I wouldn't disagree with him ultimately, but, I think that they will serve fine in this application. Most of the negative comments I found on the forums about pressed copper sleeves seemed to be about the way the finished fitting looked. I actually like the work boat kind of look they have. It is even more attractive because the look reflects that I did the work myself.
Using this tool with these parts required really taking my time setting up and making each swage, three for each sleeve, two sleeves for each eye, two eyes per stay, six stays, plus a few practice sleeves. I have to enjoy each moment of the work or I will rush to be done and botch the job.
Now on to recutting the sails.
Friday, December 12, 2014
Nav table cabinet
Well today I got the basic cabinet installed, well, put in place or dry fit. I am pretty happy with the result, but for the problem of the stain on the wood not matching the rest. I may end up having to start over with these two pieces, but if I do at least I can use these as templates.
I wasn't planning on putting doors on this cabinet, but I may yet. The doors would affect the clearance of the lifting desk lid to some degree. It is something I don't need to worry about right now.
It is very satisfying to see at least a little progress every few days. We haven't even hit winter yet (9 days til the solstice!) and even so I feel as though so much has gotten done. The interior of the boat feels as if new and has really change the character of the boat down below. It also has made the boat feel more mine, or more of a reflection of me.
 |
| New additions Starboard side. |
Saturday, December 6, 2014
Tut tut, it looks like rain!
Still more gray and wet days. Seems as though I don't remember when I last saw the sun. It hasn't been that long, I am just being a bit dramatic.
I did use the gloomy weather to get some work done in the shop. I got the "hanging knee" fashioned for the cabinetry at the navigation station.
I still need to do the finish work as in sanding and stain and varnish but the varnish won't happen until Springtime. Now that the knees are fitted and thus the dimensions of the upper shelf established and locked in, I can now work on the cabinet itself. The wood is the same reclaimed stuff that I have been making all of the trim in this project from, so I hope that it will tie all of the new accommodations together nicely when finished.
I found some high density foam pieces with a fabric backing on it. It is often sold as "interlocking rubber tiles with a berber covering" and I found that it works wonderfully as a floor cover in the cabin. It is nice to walk upon, and stiff enough to hold it's shape and not bunch up or slip the way a rug might, and it insulates the cold floor amazingly well. I would recommend it to anybody using their vessel in colder weather. It also has a nice clean appearance to it that makes up for it not being wood. Because it is so stiff cutting it to size holds it within the fiberglass pan that the cabin sole sits within. I found mine in somebodies trash but having used it wouldn't really hesitate to have to buy it, and in fact I may purchase some more just to cover other parts of the hull that need insulation, for temperature or sound. It could keep items from chaffing the inside of the hull and it floats.
The cabin has become very cozy and is a nice retreat even while sitting in the boat barn on dry land. I have to take my consolations where I can, especially this time of year.
I did use the gloomy weather to get some work done in the shop. I got the "hanging knee" fashioned for the cabinetry at the navigation station.
 |
| Nav station and first stages of the cabinet/shelf. |
I found some high density foam pieces with a fabric backing on it. It is often sold as "interlocking rubber tiles with a berber covering" and I found that it works wonderfully as a floor cover in the cabin. It is nice to walk upon, and stiff enough to hold it's shape and not bunch up or slip the way a rug might, and it insulates the cold floor amazingly well. I would recommend it to anybody using their vessel in colder weather. It also has a nice clean appearance to it that makes up for it not being wood. Because it is so stiff cutting it to size holds it within the fiberglass pan that the cabin sole sits within. I found mine in somebodies trash but having used it wouldn't really hesitate to have to buy it, and in fact I may purchase some more just to cover other parts of the hull that need insulation, for temperature or sound. It could keep items from chaffing the inside of the hull and it floats.
The cabin has become very cozy and is a nice retreat even while sitting in the boat barn on dry land. I have to take my consolations where I can, especially this time of year.
 |
| The gray floor covering is made from rubber, interlocking tiles with a berber facing. It's warm, soft, good traction, and clean looking. |
Sunday, November 16, 2014
Warm cabin
Today it was work around the property, but when it came time for a break, and afternoon tea, I decided to go to the boat to sit in the cabin and evaluate and admire the work done so far.
The cabin was cold inside, about mid thirties fahrenheit. No sunshine today to heat up the boat barn. So I lit up the oil lamps and drank my hot tea. I looked around at all the different parts coming together and enjoyed the atmosphere in the little cabin. The dark wood, the deep green fabric on the settee, the tartan plaid curtains, the bronze and brass fittings and lamps, the light of the flames in the lamps, all of it coming together to make a space that feels as comfortable as a favorite sweater.
The heat of the lamps got the thermometer moving upward. My eyes focused on the wood stove. I have yet to make the new arrangements for the stove. The new arrangements will drop the stove down lower and closer to the floor where it has always remained cold no matter what the temperature up at the ceiling. The stove arrangement is probably next on the list.
I have not lit the stove since the boat has been in it's barn. There is plenty of air circulation in the barn to allow for use of the stove, or so I suspected. It seemed like a good day to try lighting it and finding out, after all I could just light a small fire and then monitor the air in the barn and if it was fine build it up a bit. After all the lamps had warmed the place up a bit already, what ever the stove could do would only help.
The small fire was fine and though the barn got a tiny bit smoky when I started the fire, it cleared up right away. This boat has a Dickinson solid wood stove. The stove is fine for ornamentation but it is lacking for practical use. The stove top is only 3 inches deep, and that makes it hard to fit a pot or kettle. The fire box is small and the stove is made of stainless steel sheet so it doesn't have much mass, a key feature for a wood stove. Still, I can heat up the cabin a bit and the open front screen/damper gives a view of the flame. Sitting in the cabin with the wood stove burning watching the flame in the fire box or the flames of the lamps made the place really quite wonderful to be in. It is such a small cabin but on a cool or wet day coming down below to the welcoming space makes it all the better for it's size.
I wasn't going to stay long so I let the stove die down. The cabin got warmed up to just above fifty degrees in the time I was there. If I'd had a bigger fire going instead of just the little test fire I had I am sure the room would have gotten quite comfortable.
If I had it to do again, and the cost wasn't a problem I would probably get a SARDINE wood stove from Navigator Stove works. I have a LITTLE COD from them for my kitchen and it is lovely. The SARDINE would be on the large size for my boat, but just, and if I was willing to give up the port settee completely then that stove could be just great.
I will make the DICKINSON stove work and it will be fine, it is fine.
The cabin was cold inside, about mid thirties fahrenheit. No sunshine today to heat up the boat barn. So I lit up the oil lamps and drank my hot tea. I looked around at all the different parts coming together and enjoyed the atmosphere in the little cabin. The dark wood, the deep green fabric on the settee, the tartan plaid curtains, the bronze and brass fittings and lamps, the light of the flames in the lamps, all of it coming together to make a space that feels as comfortable as a favorite sweater.
The heat of the lamps got the thermometer moving upward. My eyes focused on the wood stove. I have yet to make the new arrangements for the stove. The new arrangements will drop the stove down lower and closer to the floor where it has always remained cold no matter what the temperature up at the ceiling. The stove arrangement is probably next on the list.
I have not lit the stove since the boat has been in it's barn. There is plenty of air circulation in the barn to allow for use of the stove, or so I suspected. It seemed like a good day to try lighting it and finding out, after all I could just light a small fire and then monitor the air in the barn and if it was fine build it up a bit. After all the lamps had warmed the place up a bit already, what ever the stove could do would only help.
The small fire was fine and though the barn got a tiny bit smoky when I started the fire, it cleared up right away. This boat has a Dickinson solid wood stove. The stove is fine for ornamentation but it is lacking for practical use. The stove top is only 3 inches deep, and that makes it hard to fit a pot or kettle. The fire box is small and the stove is made of stainless steel sheet so it doesn't have much mass, a key feature for a wood stove. Still, I can heat up the cabin a bit and the open front screen/damper gives a view of the flame. Sitting in the cabin with the wood stove burning watching the flame in the fire box or the flames of the lamps made the place really quite wonderful to be in. It is such a small cabin but on a cool or wet day coming down below to the welcoming space makes it all the better for it's size.
I wasn't going to stay long so I let the stove die down. The cabin got warmed up to just above fifty degrees in the time I was there. If I'd had a bigger fire going instead of just the little test fire I had I am sure the room would have gotten quite comfortable.
If I had it to do again, and the cost wasn't a problem I would probably get a SARDINE wood stove from Navigator Stove works. I have a LITTLE COD from them for my kitchen and it is lovely. The SARDINE would be on the large size for my boat, but just, and if I was willing to give up the port settee completely then that stove could be just great.
I will make the DICKINSON stove work and it will be fine, it is fine.
Saturday, November 15, 2014
Table cabinet is done!
Today I installed the cabinet/shelf/table mount.
The cabinet is made from oak shelving that I found discarded. It is on the heavy side but not to a fault, just so that it feels substantial. The back of the cabinet is paneled with the same wood that I milled down and put a bevel on the edges. I don't have the means to make a tongue and groove joint, but the bevel seems to work fine.
The cabinet is attached to the shelf above it with 4 bolts and to the back rest of the settee with 2 screws. It joins all these pieces together and make them stronger.
I will probably make a fiddle that goes half way up the cabinet for those times when sailing rail down. I am still playing with the idea of making some doors to close up the whole space, but it seems a bit much for such a small space.
 |
| New folding table/cabinet. |
The cabinet is attached to the shelf above it with 4 bolts and to the back rest of the settee with 2 screws. It joins all these pieces together and make them stronger.
 |
| The fiddle has to be stained and varnished yet |
 |
| The new cabinet and folding table mount. |
Saturday, November 1, 2014
salon table
Mocked up the salon table using the old table top. The fit is great!!! I am very happy to be using the same old top that I once used in this boat.
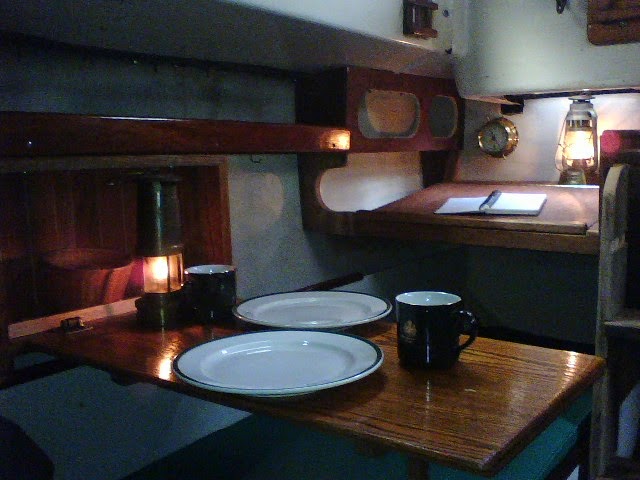
I set up my boat dinnerware just to test out the fit. It is great for such a small space and plenty for cozy dining. I am thinking of making an outboard shelf/mounting surface for the hinges of the table that will have storage for utensils and cups or condiments.....
The table folds up and out of the way for sleeping, or, it can be taken completely away with the quick connect hinges. Sweet!! There is just enough room for sitting and is quite comfortable with the bulk head as the back for one person and the nav-table the back for the other.
The cabin is 6'6" long by 8 feet wide. In it I have no got a Navigation desk, a dining table, a proper galley with sink, stove and storage, a multi-use area/shelf that would be ideal for prep cooking, a wood burning stove, and two full sized sleeping berths that double as settees! Instead of all these accommodations making the space feel smaller it actually makes it seem bigger, as if there are different areas to be in. Weird and wonderful.
Next on the list is getting the wood stove lower in the cabin, about 9 inches lower and only about 4 inches off the cabin sole. This will help a lot in heating the lower area of the boat. If I could put the wood stove in the bilge I would.
The cabin is now a nice place to be and just sit and write or read. Imagine how nice it will be when the boat is in the water!
 |
| The new table position temporarily mounted up. |
The table folds up and out of the way for sleeping, or, it can be taken completely away with the quick connect hinges. Sweet!! There is just enough room for sitting and is quite comfortable with the bulk head as the back for one person and the nav-table the back for the other.
 |
| View from the companionway. This table is just big enough for two. |
Next on the list is getting the wood stove lower in the cabin, about 9 inches lower and only about 4 inches off the cabin sole. This will help a lot in heating the lower area of the boat. If I could put the wood stove in the bilge I would.
The cabin is now a nice place to be and just sit and write or read. Imagine how nice it will be when the boat is in the water!
Interior layout of the Bristol
After being out of the water for a while, five years now, I think, and not being willing to put her back in without having taken advantage of having her right here at home, so close and easy for working on, I have finally got to work on the interior layout of the boat. I have wanted to "adjust" the layout of the cabin since I got her. The design did not include a table for dining, and the icebox that it did include was not used as such, and a waste of space. In my changes to the cockpit and my adding the cargo area, as I call it, I opened up the cabin to the space under the former cockpit and wanted to keep that access thru that was originally blocked by cabinetry and the sink.
Now, the navigation desk has replaced the icebox. The sink is over the port side and the passage under the bridge deck to the cargo area is open and useable. My thought is that a ice cooler can be used for food that needs cooling and for longer trips I can get an electric cooler (12v DC) if I feel the need. This can live under the bridge deck and be moved to where ever is convenient.
Now, the navigation desk has replaced the icebox. The sink is over the port side and the passage under the bridge deck to the cargo area is open and useable. My thought is that a ice cooler can be used for food that needs cooling and for longer trips I can get an electric cooler (12v DC) if I feel the need. This can live under the bridge deck and be moved to where ever is convenient.
 |
| The clamped in place, temporary stairs are a good fit, easy to use. The nav-desk to Starboard, sink and stove to port with berths below each |
 |
| Port berth and galley. The shelf under the bridge deck will serve as a cooking prep area. |
 |
| The nav desk will have shelves outboard of it. |
 |
| The lifting lid for storage underneath of charts and such. |
The space is small down below on such a skinny 27 footer, but it is more than enough and it is also very cozy. I have yet to add in the table, which will go over the starboard settee and fold up and out of the way. I may get to that today.
I am pretty happy with the result. Most of the parts are component and will be disassembled and finished with varnish before being finally fastened in place. Now, I can retreat to the cabin and enjoy some time in a cozy space that is familiar and useful. I may not be on the water right now, but I am still getting to mess about in boats. The boat serves as a great tiny home/studio/retreat, even while on land. The work on the cabinetry has challenged my carpentry skills a bit and made me a little better, I think.
Thursday, October 2, 2014
Presto! the mast is in one piece again.
Here is the repair of the mast with the pop rivets in. I found that the epoxy got thick pretty quickly so I worked fast. I think that with the number of rivets, the epoxy, and the area of the scarf, the mast should be pretty strong.
 |
| Looks like I took a Bedazzler to by mast! |

Ventura mast repair
As I walked across the street to collect up the fire wood I'd been chopping I looked back and caught sight of Ventura sitting there on her trailer. I had put some white primer paint over the fiberglass repairs so the big blotchy scars were not so apparent. I had a flash of the sensation of sailing her and all the kindly attributes I could ascribe her, including my surprise to discover that she was a quick little boat that could move along in the lightest air. I laughed out loud, giggled really. How many things that you own actually make you laugh out loud, or even smile each time you see them. My boats do this for me.
So with renewed energy I set to work on the mast repair.
I had cut and shaped the 2 halves of the 18 inch section of mast that I was using for the scarf repair. Now that they fit inside the mast snuggly I could start the attachment process. I decided on a pattern for the fasteners. Each half of the masts would get a total of 22 rivets, all offset so as not to create weak "perforation in the mast. I drilled out the holes in the mast to the size of the pop rivets, 3/16 inch. I then fit the sleeves inside, as snug as I could get them to the inside of the mast and chose one of the rivet placements for the first self taping sheet metal screw to be placed. I pre drilled the hole, undersize in the sleeve as it was held in place and then drove in the screw. This had the affect of drawing the sleeve in tight to the inside of the mast. This allowed me to then drive in the other fasteners and have the sleeve as tight to the inner wall as possible.
Once I finished attaching both sleeve halves to the bottom section of mast it was time to attach the upper section. Lining up the two pieces as best I could and using length of scrap metal T track set in the sail track to keep it straight and aligned I then continued the process of driving in screws. These screws are temporary, holding the sleeves in place until I put in the permanent pop rivets. Using the screws to pull the inner sleeves tight against the inside of the mast and allowing me to remove them and adjust if needed. The sheet metal screws are a smaller diameter than the pop rivets so that if a hole from a screw needs to be adjusted, the pop rivet will still be able to do it's job.
Even with only a few screws in I stood the mast up and the scarf felt very strong. I am probably going to coat the sleeves with a TiteBond epoxy, that is supposed to work on aluminum before I rivet them in place. I figure that even if the epoxy doesn't bond well, it should work as a bedding between the two surfaces.
So with renewed energy I set to work on the mast repair.
I had cut and shaped the 2 halves of the 18 inch section of mast that I was using for the scarf repair. Now that they fit inside the mast snuggly I could start the attachment process. I decided on a pattern for the fasteners. Each half of the masts would get a total of 22 rivets, all offset so as not to create weak "perforation in the mast. I drilled out the holes in the mast to the size of the pop rivets, 3/16 inch. I then fit the sleeves inside, as snug as I could get them to the inside of the mast and chose one of the rivet placements for the first self taping sheet metal screw to be placed. I pre drilled the hole, undersize in the sleeve as it was held in place and then drove in the screw. This had the affect of drawing the sleeve in tight to the inside of the mast. This allowed me to then drive in the other fasteners and have the sleeve as tight to the inner wall as possible.
Once I finished attaching both sleeve halves to the bottom section of mast it was time to attach the upper section. Lining up the two pieces as best I could and using length of scrap metal T track set in the sail track to keep it straight and aligned I then continued the process of driving in screws. These screws are temporary, holding the sleeves in place until I put in the permanent pop rivets. Using the screws to pull the inner sleeves tight against the inside of the mast and allowing me to remove them and adjust if needed. The sheet metal screws are a smaller diameter than the pop rivets so that if a hole from a screw needs to be adjusted, the pop rivet will still be able to do it's job.
Even with only a few screws in I stood the mast up and the scarf felt very strong. I am probably going to coat the sleeves with a TiteBond epoxy, that is supposed to work on aluminum before I rivet them in place. I figure that even if the epoxy doesn't bond well, it should work as a bedding between the two surfaces.
Saturday, August 30, 2014
Ice box removal!
This week past I got the icebox removed from the Bristol. It took up a LOT of space and I never, well almost never, used it as an icebox, it mostly stored galley stuffs, plates, food...kind of an inefficient use of the space, and on a small, skinny sail boat, that could be considered criminal.
I had read an account of Daniel Spurr's removal of his icebox from his Pearson Triton, almost the same boat as the Bristol 27 in many ways, and he put fear into me about the project, saying it was difficult and messy. I can only assume that Pearson and Bristol built their boats a bit differently from each other because the job was not to bad at all.
I took my time trying to deconstruct the icebox rather than just taking a cutting tool to it. As I unscrewed the outer plywood structure the attachment points to the hull became apparent. It was basically 4 large wood screws that went thru a bulkhead, easily reachable from the cargo hold(or if you don't have my customized Bristol 27, from the starboard cockpit locker, and making a cut in the fiber glass along the cockpit access hatch (10x12 opening). I also had to cut off the fiberglass drain tube that went thru the bulkhead in order to wiggle the icebox out of position once it was cut free.
Now I have a HUGE amount of space at the foot of the starboard settee/berth. I plan to make a chart table/desk in that place and in doing so increase the foot room for the berth.
Now I get to do what I enjoy doing so much, I get to sit in the cabin and stare and think and imagine and conjure and cogitate over what the new area and accommodations will look like, what they will do to make life aboard better. I have the winter to do the figuring, and the building. I have longer than that if I choose, but knowing that I have the time allows me to take the time to enjoy the designing process. So, sitting in the corner of the port side berth, next to the wood stove, with a cup of coffee and a sketch pad and a dream sounds like a great way to spend some of the coming season, almost as good as if the boat were in a berth, floating, but not quite.
I had read an account of Daniel Spurr's removal of his icebox from his Pearson Triton, almost the same boat as the Bristol 27 in many ways, and he put fear into me about the project, saying it was difficult and messy. I can only assume that Pearson and Bristol built their boats a bit differently from each other because the job was not to bad at all.
I took my time trying to deconstruct the icebox rather than just taking a cutting tool to it. As I unscrewed the outer plywood structure the attachment points to the hull became apparent. It was basically 4 large wood screws that went thru a bulkhead, easily reachable from the cargo hold(or if you don't have my customized Bristol 27, from the starboard cockpit locker, and making a cut in the fiber glass along the cockpit access hatch (10x12 opening). I also had to cut off the fiberglass drain tube that went thru the bulkhead in order to wiggle the icebox out of position once it was cut free.
Now I have a HUGE amount of space at the foot of the starboard settee/berth. I plan to make a chart table/desk in that place and in doing so increase the foot room for the berth.
Now I get to do what I enjoy doing so much, I get to sit in the cabin and stare and think and imagine and conjure and cogitate over what the new area and accommodations will look like, what they will do to make life aboard better. I have the winter to do the figuring, and the building. I have longer than that if I choose, but knowing that I have the time allows me to take the time to enjoy the designing process. So, sitting in the corner of the port side berth, next to the wood stove, with a cup of coffee and a sketch pad and a dream sounds like a great way to spend some of the coming season, almost as good as if the boat were in a berth, floating, but not quite.
Friday, August 22, 2014
Remodeled galley
The new galley arrangement is pretty much in. At least all the big work is done, the layout decided, the framing cut and installed and the test fitting of the whole thing. I think I will be very happy with this setup.
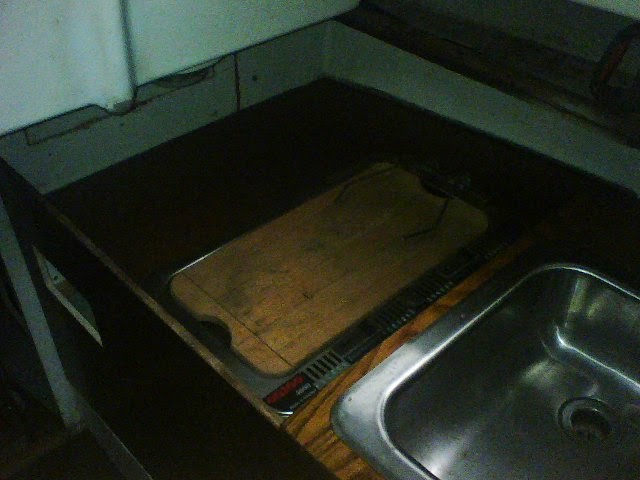
This set up accomplishes two things very well that I've wanted but up until now couldn't figure out how to get it. The first thing is that I wanted a galley that I could really work at. I am 6'1" tall and the boat is perfect for a person about 2 inches shorter than I am, but for me I have to stoop almost constantly. Getting the galley along the port side allows me to stand with my head under the companionway hatch where a few inches of height is gained. The sink is elevated so that it is at a good height for washing up or with a cutting board on top and I don't have to suffer a back ache. With the sink elevated the stove top is in a sort of well about 6 inches deep. This will add security to the cooking when in a seaway or the odd wake comes by.
The other thing that is accomplished with this set up is that the port settee/berth is still quite useable. The sitting space is generous for one person and the berth is still very easy to get in or out of. The raised sink keeps the plumbing from conflicting with habitation of the space.
I have yet to install the fresh water pump as I am reworking it. It is an older style pump, chromed bronze, and quite nice. I plan to install it forward of the sink so that it aligns with the drain and is easily right hand operated.
I am more in the mind of using small containers for water storage these days but this is a simple manual system and the tank is 20 gallons (I think) under the v-berth with access hatches to clean it out. Pretty simple and I don't even have to keep the tank full to make it useful.
All the way aft, under the stove counter top, I have built and added a drawer that is about 15 inches deep, and 8 inches wide. This drawer uses up space that is otherwise wasted and still does not interfere with the feet of the person in the port berth. I hope to make the face of the drawer match the sink counter top, which is made from varnished reclaimed wood. The wood was from a very old table I found in a trash pile. Scraping away the 2 or 3 layers of different color of paint and sanding revealed a nice wood that is blondish with dark grains running thru it. The facings, on the stove counter and the bulkheads are all stained and varnished Luan plywood. I use it because it is cheap and uses exterior grade glue and has a nice red color to it, a type of mahogany I think, or at least it looks that way. Using a stain I have got it to match the existing varnished plywood bulkheads pretty closely.
The stove is a two burner alcohol stove which has served pretty well. The sink could be deeper to my taste but it is what the boat came with and will serve.
It is good not to have to look at all that white/greenish/yellow formica counter top that spoke so strongly of the 1960's, when this boat was built. Though the varnished and stained wood is dark it is rich looking and with the white paint anywhere the varnished wood is not the over all affect will be pleasing, I hope and suspect.
 |
| The sink counter is solid wood, grainy and looks old, but in a good way. |
This set up accomplishes two things very well that I've wanted but up until now couldn't figure out how to get it. The first thing is that I wanted a galley that I could really work at. I am 6'1" tall and the boat is perfect for a person about 2 inches shorter than I am, but for me I have to stoop almost constantly. Getting the galley along the port side allows me to stand with my head under the companionway hatch where a few inches of height is gained. The sink is elevated so that it is at a good height for washing up or with a cutting board on top and I don't have to suffer a back ache. With the sink elevated the stove top is in a sort of well about 6 inches deep. This will add security to the cooking when in a seaway or the odd wake comes by.
 |
| Forward of the sink there is still room to sit comfortably, with feet on the cabin sole or under the sink. The wood stove is just off the right edge of the picture and will make this a cozy place to sit |
I have yet to install the fresh water pump as I am reworking it. It is an older style pump, chromed bronze, and quite nice. I plan to install it forward of the sink so that it aligns with the drain and is easily right hand operated.
I am more in the mind of using small containers for water storage these days but this is a simple manual system and the tank is 20 gallons (I think) under the v-berth with access hatches to clean it out. Pretty simple and I don't even have to keep the tank full to make it useful.
 |
| The drawer is yet to be put in place and the trim is a project for the winter. |
All the way aft, under the stove counter top, I have built and added a drawer that is about 15 inches deep, and 8 inches wide. This drawer uses up space that is otherwise wasted and still does not interfere with the feet of the person in the port berth. I hope to make the face of the drawer match the sink counter top, which is made from varnished reclaimed wood. The wood was from a very old table I found in a trash pile. Scraping away the 2 or 3 layers of different color of paint and sanding revealed a nice wood that is blondish with dark grains running thru it. The facings, on the stove counter and the bulkheads are all stained and varnished Luan plywood. I use it because it is cheap and uses exterior grade glue and has a nice red color to it, a type of mahogany I think, or at least it looks that way. Using a stain I have got it to match the existing varnished plywood bulkheads pretty closely.
 |
| Two burner alcohol stove and original sink. The stove counter is lower than the sink adding a bit of safety for pots that might jump as well as all the galley stuff. |
The stove is a two burner alcohol stove which has served pretty well. The sink could be deeper to my taste but it is what the boat came with and will serve.
It is good not to have to look at all that white/greenish/yellow formica counter top that spoke so strongly of the 1960's, when this boat was built. Though the varnished and stained wood is dark it is rich looking and with the white paint anywhere the varnished wood is not the over all affect will be pleasing, I hope and suspect.
 |
| I have the cruising model but now with the galley along the port side On the dinette model the galley takes up the entire starboard side. I like my compromise better as I keep the port berth |
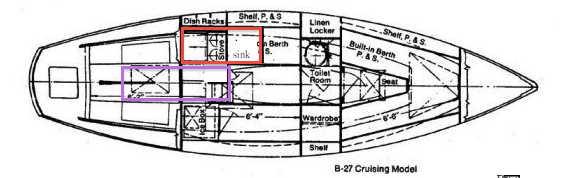 |
| The red area is the new galley The purple area is the "hold" that is open to the cabin and replaced the larger part of the cockpit. |
Thursday, July 31, 2014
epoxy and fiberglass
Yesterday I did the fiberglass work on the Venture. Working with this stuff is so distasteful that I seriously considered not doing, stripping the hull and taking the boat to be scrapped, then building a wooden boat replacement. In the end I couldn't deal with the idea of being so wasteful and started mixing up epoxy resin.
I had ground down the holes in the deck so that I could layer in the fiberglass patches already. So I taped up the wholes from inside the cabin to create a bottom and wet out the hole with epoxy for bonding then added a layer with fairing compound so I could shape it from the underside should I go that far, but I seriously doubt I will. Then came layer upon layer of chopped strand and mat fiberglass. After that had gotten somewhat solid but still green, I put a layer of epoxy thickened with fairing compound so that I could create a smooth sanded surface.
I was lucky that the day was cool and a slight breeze kept the smells from just saturating me. Checking this morning it all looks pretty good. At the mast step I added extra layers of glass for strength.
I may start sanding later today.
I am very much considering cutting down the mast height a bit. I don't race and want a boat that will be easy to use. I think the mast was about 24 feet long and a 21 or even 20 foot mast would be that much easier to rig at launchings. The reduced sail area would be a bit but I am not to overly concerned. I still have to scarf the mast back together so nows the time to make these choices.
I had ground down the holes in the deck so that I could layer in the fiberglass patches already. So I taped up the wholes from inside the cabin to create a bottom and wet out the hole with epoxy for bonding then added a layer with fairing compound so I could shape it from the underside should I go that far, but I seriously doubt I will. Then came layer upon layer of chopped strand and mat fiberglass. After that had gotten somewhat solid but still green, I put a layer of epoxy thickened with fairing compound so that I could create a smooth sanded surface.
I was lucky that the day was cool and a slight breeze kept the smells from just saturating me. Checking this morning it all looks pretty good. At the mast step I added extra layers of glass for strength.
I may start sanding later today.
I am very much considering cutting down the mast height a bit. I don't race and want a boat that will be easy to use. I think the mast was about 24 feet long and a 21 or even 20 foot mast would be that much easier to rig at launchings. The reduced sail area would be a bit but I am not to overly concerned. I still have to scarf the mast back together so nows the time to make these choices.
Friday, July 25, 2014
IT has begun
Yesterday I started the repair of the Venture 21 by taking the old winch rig for the centerboard off and sizing up the new replacement one. I also bailed out all of the water that had leaked in over the past couple of months during the heavy rain storms, about 10 gallons. I have been leaving the hatches open to dry it all out.
I also took off the starboard forward lifeline stanchion and straightened it out, almost to what it was. It is plenty good enough. I took off the remaining wire life line in preparation for replacing those lines with rope. In my thinking rope is plenty strong enough and it has more elasticity. Stanchions are know to rip out or bend and at least leak after being worked by force on the lines. On my larger boat the lifelines are rope and have served just fine.
Today I got the grinder out and ground down the spots on the deck that will need to be repaired with fiberglass and epoxy patches. The four points where the bow pulpit was and the mast step. I intend to use just fiberglass to repair even where it was cored with plywood. I like my repairs to be stronger than original if possible.
Getting all the gear together and protection for myself I was reminded of how much I hate working with fiberglass. This alone is enough of a reason to get rid of my glass boats and make the fleet all wood. Upon starting in with the grinder I was immediately taken back to the days when I remodeled my Bristol by cutting out the cockpit and making a flush deck, by the smell of melting/grinding gel coat and polyester resin. It isn't a totally unpleasant smell in that it has connotations of really great times doing fun and crazy things with boats back when I first started boating. It is really the dust that goes everywhere and is always itchy later on. I have found the best way to get if off is to shower in COLD water with shampoo to float all of the dust off. The cold water keeps your pores from opening up and letting the dust get deeper in to your skin.
It is good to see these great big holes in the deck right now because I know that they mean progress. In truth I'd much rather just scrap this boat and build a wooden replacement for it, but I hate just throwing things out when they can be made useful. Nobody nibbled at the Craig's list add for the boat, so I guess that I am stuck with it for now.
I am thinking of it as the "Frankenstein" boat. I will patch it, and get it back on the water with whatever can be had for free or really cheap. I intend not to do anything about the accommodations below. The boat is just to get me on the water as cheaply and easily as possible for daysails. If I stick to this line of thought I might just get back on the water for Fall sailing.
I also took off the starboard forward lifeline stanchion and straightened it out, almost to what it was. It is plenty good enough. I took off the remaining wire life line in preparation for replacing those lines with rope. In my thinking rope is plenty strong enough and it has more elasticity. Stanchions are know to rip out or bend and at least leak after being worked by force on the lines. On my larger boat the lifelines are rope and have served just fine.
Today I got the grinder out and ground down the spots on the deck that will need to be repaired with fiberglass and epoxy patches. The four points where the bow pulpit was and the mast step. I intend to use just fiberglass to repair even where it was cored with plywood. I like my repairs to be stronger than original if possible.
Getting all the gear together and protection for myself I was reminded of how much I hate working with fiberglass. This alone is enough of a reason to get rid of my glass boats and make the fleet all wood. Upon starting in with the grinder I was immediately taken back to the days when I remodeled my Bristol by cutting out the cockpit and making a flush deck, by the smell of melting/grinding gel coat and polyester resin. It isn't a totally unpleasant smell in that it has connotations of really great times doing fun and crazy things with boats back when I first started boating. It is really the dust that goes everywhere and is always itchy later on. I have found the best way to get if off is to shower in COLD water with shampoo to float all of the dust off. The cold water keeps your pores from opening up and letting the dust get deeper in to your skin.
It is good to see these great big holes in the deck right now because I know that they mean progress. In truth I'd much rather just scrap this boat and build a wooden replacement for it, but I hate just throwing things out when they can be made useful. Nobody nibbled at the Craig's list add for the boat, so I guess that I am stuck with it for now.
I am thinking of it as the "Frankenstein" boat. I will patch it, and get it back on the water with whatever can be had for free or really cheap. I intend not to do anything about the accommodations below. The boat is just to get me on the water as cheaply and easily as possible for daysails. If I stick to this line of thought I might just get back on the water for Fall sailing.
Friday, May 9, 2014
Movin on, maybe
I posted to the Venture on Craig's list today. Maybe somebody will need a good, cheap project boat. I will go ahead and start the repairs anyway.
http://hudsonvalley.craigslist.org/boa/4461896475.html
Seems like a Reasonable thing to do.

http://hudsonvalley.craigslist.org/boa/4461896475.html
Seems like a Reasonable thing to do.
Subscribe to:
Posts (Atom)