Pages

Wednesday, November 30, 2011

4=2


After letting the 4 pieces that make up the side panels sit for a day while I was away, I now have 2 side panels.  The Gorilla Glue seemed to do alright.
side panel scarf
To apply the glue I wet the wood on the scarf and I put the glue on the panels with a scraper/putty knife so as to keep the amount to a minimum and also to make sure that coverage was complete.  A little glue oozed out and foamed up but not much and that was taken down with a chisel as a knife.
top: butt plate at scarf.
 bottom:  front of panel after gluing. gap is just filled
After cleaning up the excess glue I lined up the 2 side panels face to face to see how true a match I had.  The tip of the bow and the tip of the stern lined up perfectly and most of the after panels were just right.  The forward panels were slightly off in a few places and I am inclined to think that this was due to sloppy measurements and fat pencil lines, and sloppy cuts.  I marked the places that needed fixing with tape and took a sureform to them until I had 2 matching sides.  If the lines, the sheer and bottom are not fair at least the two sides will be symmetric.
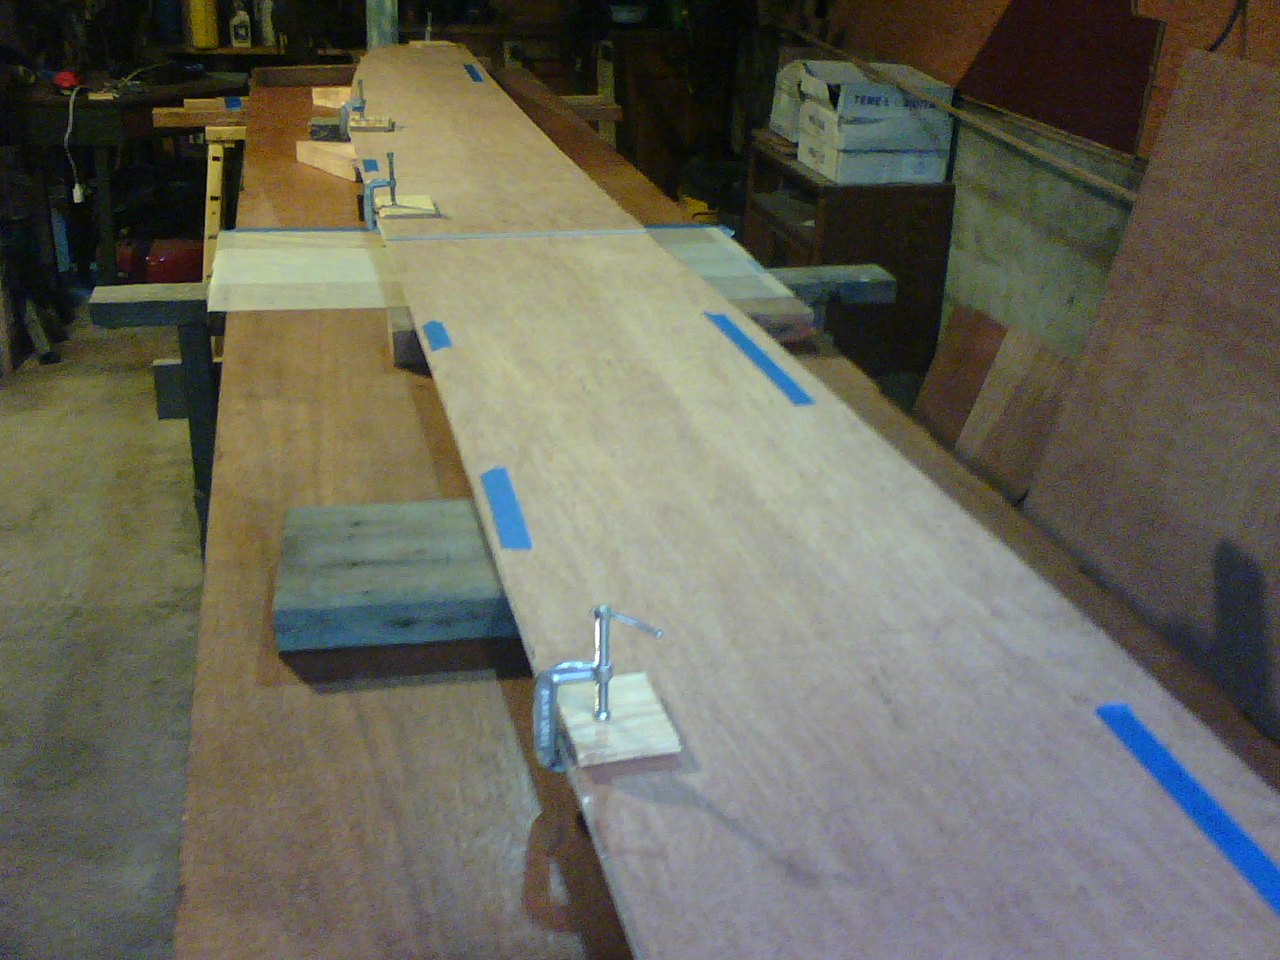
The blue tape indicates places the 2 sides need to be trimmed to match.
I started in on putting the framing on the transom.  I didn't get to far before the cold of the evening took over the garage and I was done for the day.
Transom as framing is added.
I am cutting the frames for the stations from fir 2x4 scraps.  I will fasten and glue them to the plywood panels.  I am keeping station 10 and 4 as bulkheads so I will make those and the transom a bit different than stations 2 and 7.  For fasteners I decided to try using brass wood screws.  I am not sure how lasting they will be.  I bought some stainless steel shake nails, that look like ring nails.  I'm thinking of using these to fasten the bulkheads to the side panels.
brass pins used as clinch nail in test piece seemed to work alright.

I also bought some brass brads or eschutcheon pins that I am thinking of using as clinch nails for a mechanical fastener on the side panel scarf.  I am really ignorant to the cons of using brass.

I think I will have to take my time to get all the framing cut and applied to the stations.  It is getting cold these days so that may slow me down as well.  It is nice to have gotten something done, a step is a step.


Monday, November 28, 2011

A sticky situation

Today I finished cutting out the rest of the parts from the plywood.  I tried using a circular saw set shallow, as is suggested in J. Mackalaks book, but I really didn't like it as much as using the jig saw and the cut wasn't as clean as the jig saw either.

In the plans form 10 is taken in 2 pieces from two different sheets of ply.  I found space to cut it out as one piece  in space that is not claimed by the parts of the boat and cut it out this way.  this is especially good since I plan to make form 10 into a bulkhead and the forward end of the after compartment.

To scarf the foreward and the after parts of the sides together I chose to use a butt block and glue as is suggested in the construction instructions.  I also chose not to use any fasteners on this scarf, as the designer said he has done.

glueing up the side panels
I read in Iain Oughtred's book on clinker lapstrake plywood boat building that he used 4x8 sheets of plywood cut in half length wise to make long coffin like boxes with 3 sides that when laid down on the shop floor become the building platform.  He uses this as a substitute for a building jig or ladder.  I didn't have the spare ply to use but I did have a bunch of old closed doors that I haven't any use for.  Actually I used two of them to roof my chicken coop.  I put these doors on saw horses and fastened them end to end and to the horses and they make a 13 foot table that is just big enough to glue up both side planks at the same time.  I am thinking about making shorter horses for this "boat building station" as right now they are 35" off the ground.  24'' or so would be better.  But for now I like my flat long work table.

My closet door boat building station.  Two 6'6" x 3' closet doors scarfed end to end on saw horses.
Makes a long flat surface that I can nail into.  The doors are hollow core so only the edges are structural.

I can't work on the boat tomorrow so that will give the glue time to set.  I used a 3/4x4'' board on top of the butt scarfs and drove a screw thru it to the table at the center to clamp the scarf.  I then put a 4'long angle iron, very heavy across the 2 scarfs and clamped it to the saw horses, then added a 30 lb. weight to the whole thing.

I am using "Gorrilla Glue" and am a little concerned about the expansion of it.  I could hear it as it pushed out of the joint almost immediately.  I am wondering if the pressure of the clamp increased it's rate of cure some?  I clamped the side panels to the bench and my hope is the the foam glue will fill the gap on the outside, but not to much.  Guess I'll find out on Wednesday.

I have decided not to add any layers to the hull planks but I may add something to the bottom in the cockpit area.

Sunday, November 27, 2011

The compromise

I just like this.
Today I cut the sheer line on the side panels.  Again I used a pull saw and my arms.  I cut a little wide and then used a plane and sureform down to the line.  This took a lot of time, but it was time I really enjoyed.  It was a nice day and the big doors were open to the day.  Later when I found I had a little time I came back to the project.  Since I had only a little time I thought I'd try using the jigsaw to maybe get one of the after side panels cut.  I took my time and moved the saw very slowly.  It was just what I had expected.  I made a very nice cut, right on the line, but leaving it.  No plane or sureform needed.  It went pretty quickly too, in fact I cut both P&S panels out in less time than it took me to cut one by hand.  The other part of using the power jig saw that was just as I had anticipated was the whining noise of the motor and the ring in my ears that remained when I turned it off.  While using the jig saw I couldn't hear the acoustic guitar recording I had on the stereo as I could while using the hand saw.

So I have to choose.  I am sure that the compromise will be that when I want to get somethings done and a time table is in mind, I may use the power tools.  When I just want to enjoy the experience and the day or some music, it will be hand tools.  I will also choose the hand tools when I want to hone my skills with them for future projects that will require more technique and higher tolerances.

I am still worried about the flimsiness of the 5mm luan for this boat.  I have thought about just doubling all the panels and then glueing, or laminating I guess you'd call it, them together to have a 10 mm hull thickness.  That's slightly over 3/8 of an inch while the plans call for 1/4 inch.  Price wise it comes out about the same as if I had bought the 1/4 inch to begin with, but I didn't like plywood that was available in that size with all the footballs and one side a little rough.

One advantage might be that I could offset the scarphs and not have to use butt blocks.  I am not sure and may not be able to decide until I have already nailed the side panels to the stations.

Friday, November 25, 2011

Thanksgiving

THANKS FOR THE chance to build a boat of my very own, for the space in which to build it, for the time and resources, for the dream of it.

work table with wood stove in the background.


11/25- (3hrs) 
finished drawing fair curves for top and bottom of side panels.  When I took away the battens and stood back to examine the lines I noticed something wrong with the starboard side panel.
clamping the batten to nails driven into the plywood at station marks

 It was subtle but not quite right.  I stared at it for a while then took up measuring all my marks.  As it turns out I had made an 1/8th inch mistake on frame 7.  That 1/8th inch made the bottom seem all wrong and squirrelly.
cutting side panels
Cut out foreword panels, P&S, and form #2 and 1/2 form #10.  I used a japanese pull saw to cut the patterns.  The Jim Machalak recommends using a shallow set circular saw but it was a really nice day out, warm and blu skies, and I had the big doors open in the shop and the thought of hearing power tools just hit me wrong.  The pull saw worked just fine.  I cut just on or outside the lines and will plane down to the lines later.  This luan is very thin and I worry that it won't be strong enough to hold it's own shape or that it might flex.  I think adding frames to the boat would not be difficult or problematic and I could even put stringers on the added frames if needed.
After cutting out station 2 panel I tried to use the ban saw to get close to the line but I think the hand saw and the plane or sureform are much cleaner.  The added time and effort are kind like meditation, calming.
station 2 and P&S forward side panels.
I realize that cut out the bow and bottom of the foreword panels but I forgot to cut the sheer line.  I'll get back to it another time.  I am trying to plan ahead for the compartments I want to have forward and aft.  I was hoping it would be as simple as leaving in station #2 and #10, and it may yet prove to be, but I am sure I will have to add a shelf and stringers athwart ship to keep from going thru the decks.  


A beginning

SO IT BEGINS with a step.  I suppose the first step was deciding on a design.  In order to make that step I had to make a list of things I wanted the boat to be.  The list seemed to change every time I revisited it.  In the end it got smaller and that was what allowed me to pick a design.
I searched the web and all the books I could find then decided that given my lack of experience or confidence in my abilities in this discipline, I would look toward those boats intended for the first time amateur builder.  I bought Jim Michalak's book "Boat building for Beginners, and beyond".  This book is so down to earth and unassuming in it's tone that it seemed just the right thing.  The book includes plans for about 7 boats, including the QT rowing skiff.

QT ROWING SKIFF 
13' X 45", 75 POUNDS EMPTY
Designer, Jim Michalak

I knew I was going to do it when I went to the local lumberyard and bought the first of the materials.  I came home and started clearing the spot in the shop that I had in my mind for boat building.  I also rummaged thru the bins of "stuff" I have and found 3 light fixtures that I then wired up to the ceiling to give the needed coverage of light.


3 -4x8x5.2mil. Lauan plywood $13.10ea $39.30 11/15/11
1 -Gorilla glue 18oz. $15.99 11/15/11

11/23- (5hrs.)
Laid out ply in shop and drew the patterns of the sides and 2.5 of the frames.
-Cut a 3/8"x3/4" batten from clear pine.
-finish nails in stations and clamped batten to nails, drew bottom curve.
In this space one can either store a car or build a boat.  Not a tough choice really.

A SKIFF wind blows the autumn leaves from the trees

For a long time I have had dreams & aspirations of building myself a wooden boat.  I have also had real knowledge of my limitations as a craftsman or carpenter.  The desire to become better at something that I feel limited in has only made me want to build a boat even more.  Well as with most things, baby steps can often be the best way to start.
I have often built my own furniture and done remodel work on my homes, but none of this could be considered in the same class as the craft that is building a wooden boat.  So, I am cheating, kind of.
I have decided to build a 13' rowing skiff in plywood construction.  It is a very simple boat.  Plywood though wood, is also not the same as a plank or solid wood boat.  I chose to build in plywood for two reasons.  The first is that it is wood and simple designs can be found using it.  The second reason is that the boat I want to build will be dry stored, that is it will be wet then dry then wet.  This kind of life can be very hard on a solid wood boat because of the swelling and shrinkage of the wood during it's life in the two different worlds.  I wanted a boat that I could store at home and then transport to the water in the back of my truck, thus saving me the fees of a marina or club.
I have a 2 car garage that is up a steep drive and during the cold and snowy months is often inaccessible in my cars.  It serves much better as a workshop for the house and now as a boatbuilding shop.  Working in there during the winter with the wood stove burning and the cold sneaking in the cracks of the siding is a strangely attractive idea to me.
I have no great illusions that just because I want to be a boat builder that I will be any good at it.  I am pretty sure that I can build myself a decent craft that will keep me afloat upon the water, and in the end I suppose that is enough.
I hope that this project, if it goes well and brings me joy and satisfaction, and most importantly, at the end a little boat to row upon the river and explore it's shores, will be the first of at least a couple of boat building projects.  If someday I should build a boat that is handsome enough to catch the eye of some other romantic fool who has dreams of being out in the water when he could be at home in a chair under a tree, and that dreamer asks me if I might part with the little boat, or build one like it for him, then I suppose I might consider myself a boat builder, but for now, the baby steps all I can manage.  I have decided on a boat design.  No small feat really.  I have put down money for wood to build her with.  I have even begun the process of measuring and then putting down lines and shapes on the wood.  It is a magical moment when the little drawings are recreated in full scale on the floor of the shop and the essence of a boat starts to be sensed hidden in the wood and fasteners and glues and ideas scattered all about the shop.
Autumn seems the right time to start to build a boat.  As the water gets cold and looses some of it's appeal, and as the wind gets blustery to the point of making being upon the water a slightly risky affair, and as more boats are seen propped up on cradles and up on stands, drying out for the winter months, it seems to be just right to be involved in dreaming and planning and carving out, not to far from the warmth of the fire, a little craft of boat of wood.