
Showing posts with label sailing rig. Show all posts
Showing posts with label sailing rig. Show all posts
Wednesday, March 8, 2017
New Jib
A nice pre-Spring day and I got the boat out of the barn to fit the jib I just finished sewing. The jib is made from a piece of scrap from an old sail. The halyard goes thru a bee hole at the top of the mast. The luff of the sail is roped, with eyes spliced at the head and tack. The clue also has an eye sewn into it.
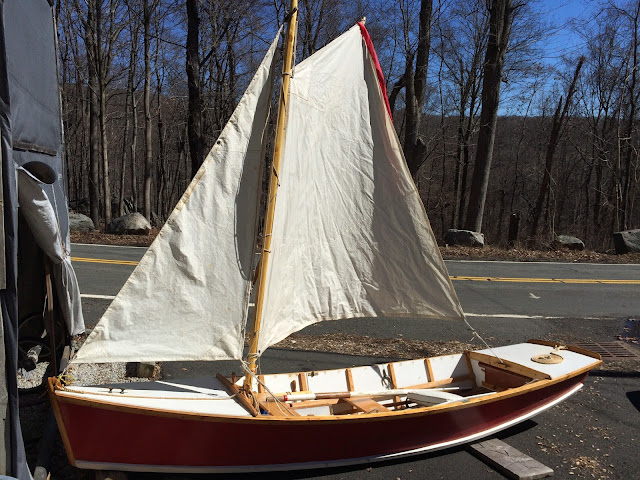 This is also the new, taller, mast. Today I made the pad eyes that I will use for sheet leads for the jib. FUN!

Wednesday, October 5, 2016
It's good to be Back
Went out yesterday evening for a nice 3 hour sail. I had meant to test out the rudder on the skiff but realized I had bent one of the gudgeons by dropping the stern of the boat while trying to off load it from the pick up sometime ago. The up side was that I didn't need to worry about how the rudder and steering stick worked, and just enjoyed an evening sail to the light house and back. It was gusty but I think I just about got it right for the amount of sail I have on the rig now. The boat has weather helm, good, but not so much as to loose control. The big gusts are easily spilled by easing the mainsheet, and yet, the boat moves along in a light breeze.
Today the weather was even better and I wanted to fix the rudder rig and test it out. I have been under the belief that steering with the oars works very well and makes for one less bit of gear in the boat to have to control and store and carry, but, I had built this rudder and wanted to try it out. The rudder is made our of cedar (formerly somebodies decking material for their house) and has positive buoyancy. The tiller, or rather, the steering stick is yellow pine and works by pulling fore and aft.
Though it does add a complication to the rig, it does work nicely. I was concerned that the rudder might not have enough wet surface area to provide steerage but at least in moderate winds, it's just fine. The steering stick could be a bit longer, maybe a foot or foot and a half, and I need to replace the toggle that locks the rudder pintles into the gudgeons, I just tied them together today.
Power sailing for this boat is rowing with the sail up, and it works great. The transition from rowing to just sailing is quick and easy, just pull in the oars, don't even need to pull them out of their oarlocks. Steering from the rowing position is easy with the tiller and main sheet easily within reach.
The mainsheet comes from the clue of the sail down to a detachable block on a ring seized to the stern painter on the transom, then is bent around the forward oarlock sockets then to a cleat on the daggerboard, though I don't cleat it off much.
I also saw the sailing vessel UNICORN today, and the skipper was kind enough to invite me aboard to take a look see. She is about 108' LOA with square sails and fore and aft sails. I need to look up what that makes her, windjammer, full rigged ship, clipper??????? Great boat. Enjoyed meeting the Skipper, If this were a month ago, or things were just a bit different, I'd be pleading for a berth to get the ship down to the Chesapeake. It would be what some people call a "BUCKETLIST" item for me, sailing a tall ship.
Waiting out Hurricane Matthew by going on perfect daysails here and knowing that people down south are dying a losing their homes, land, is kind of strange. I guess somewhere in the world something really hard is always happening while something wonderful is also going on.
Today the weather was even better and I wanted to fix the rudder rig and test it out. I have been under the belief that steering with the oars works very well and makes for one less bit of gear in the boat to have to control and store and carry, but, I had built this rudder and wanted to try it out. The rudder is made our of cedar (formerly somebodies decking material for their house) and has positive buoyancy. The tiller, or rather, the steering stick is yellow pine and works by pulling fore and aft.
Though it does add a complication to the rig, it does work nicely. I was concerned that the rudder might not have enough wet surface area to provide steerage but at least in moderate winds, it's just fine. The steering stick could be a bit longer, maybe a foot or foot and a half, and I need to replace the toggle that locks the rudder pintles into the gudgeons, I just tied them together today.
Power sailing for this boat is rowing with the sail up, and it works great. The transition from rowing to just sailing is quick and easy, just pull in the oars, don't even need to pull them out of their oarlocks. Steering from the rowing position is easy with the tiller and main sheet easily within reach.
 |
| sailing rig ready to go in a matter of minutes, 2 minutes at the most. |
 |
| Dagger board trunk being built |
 |
| Dagger board in use. A bungee cord allows for adjusting to any amount of board depth. |
 | |
| An Ocean going canoe catamaran at the local marina. Really amazing and beautiful. |
Waiting out Hurricane Matthew by going on perfect daysails here and knowing that people down south are dying a losing their homes, land, is kind of strange. I guess somewhere in the world something really hard is always happening while something wonderful is also going on.
Thursday, July 16, 2015
Skiffing it again
So now that I have one less boat to focus on, I not only feel a bit relieved, but also a bit invigorated to use the boats I have. The Bristol is still not an option for sailing, but I can continue working on her interior. I love being in her cabin so doing this work is a pleasure.
The only other sailing boat I have is the skiff. The reduction of the sail area was a good thing. The spars are smaller and easier to deal with, and the boat can be out in stronger wind. On the negative side, the new sail plan seems to have moved the center of effort forward enough so that she really doesn't sail to windward. Previously I was able to move myself forward and get the resistance underwater forward so she would just make to windward. I was able to get away without a foil (daggerboard, swing keel or lee board), but now the sails center of effort combined with the reduced area, seem to mean that I can't get the underbody center of effort far enough forward and there is not enough drive from the sail to get her to overcome making leeway. Or so I am assessing the situation.
I have 2 possibilities, I believe, for remedy. 1) build a trunk and dagger board and install it 2) add a mizzen sail.
The daggerboard option is pretty obvious, but there are drawbacks to it. First is that the keel on the boat is only 1-1/2 inches wide so the trunk would have to be constructed in a way to compensate for the loss of keel structure. I have an idea how this could be done, but it does mean cutting a hole in the bottom of the skiff. It also means loosing the space that right now is pretty comfortable, and this boat has minimal beam so loosing any space is not the most wonderful thing.
The idea for adding a mizzen is that not only would it shift the center of effort aft, where there is more underbody, but it would add sail area, that was lost, but down low, where it wouldn't cause as much heal in a skinny boat. I also think that a mizzen might make the boat capable of steering herself, or at least using the trim of the mizzen to balance her out. On the negative side the mizzen would be one more spar to deal with, two actually counting the boom or yard and it would mean retrofitting a mast step in the after deck. It would do nothing to improve the resistance to leeway for the underbody, but I think I might be able to gain back the ability to sail just to windward.
A mizzen would be a sharpie sprit sail, with a sprit yard that is parallel to the waterline, and a sheet lead to the transom. A standard boom and right angle at the foot and luff would also work. The mizzen mast could also give a better lead for the mainsheet. Bonus.
Well, suddenly it's a lot of sail area. The thing about adding the mizzen is that it can easily be not used if it proves to be a bad choice, and with out any real alterations to the hull. If it does work but the boat seems to really want the centerboard still, I can always add it later. The centerboard might also add some counter resistance to the sails.
The mizzen mast would make a cockpit tent rig very easy, just a line between the masts and a tarp. Sailing with jib and mizzen only might be an interesting option too.
This boat is really too skinning to be a good choice for sailing. But, it is what I have right now. I can still row it and sail it while building the mizzen and sewing the sail. I would really like a beamier boat for sailing but I would like to enjoy not having so many boats for a while. I think that this winter I may take on building a real sailing boat in the under 15 foot range. For now I will just try this and see how it goes.
It is all just messing about.
 |
| Skiff with Current rig. |
I have 2 possibilities, I believe, for remedy. 1) build a trunk and dagger board and install it 2) add a mizzen sail.
The daggerboard option is pretty obvious, but there are drawbacks to it. First is that the keel on the boat is only 1-1/2 inches wide so the trunk would have to be constructed in a way to compensate for the loss of keel structure. I have an idea how this could be done, but it does mean cutting a hole in the bottom of the skiff. It also means loosing the space that right now is pretty comfortable, and this boat has minimal beam so loosing any space is not the most wonderful thing.
The idea for adding a mizzen is that not only would it shift the center of effort aft, where there is more underbody, but it would add sail area, that was lost, but down low, where it wouldn't cause as much heal in a skinny boat. I also think that a mizzen might make the boat capable of steering herself, or at least using the trim of the mizzen to balance her out. On the negative side the mizzen would be one more spar to deal with, two actually counting the boom or yard and it would mean retrofitting a mast step in the after deck. It would do nothing to improve the resistance to leeway for the underbody, but I think I might be able to gain back the ability to sail just to windward.
 |
| mocked up ketch rig w/jib |
The mizzen mast would make a cockpit tent rig very easy, just a line between the masts and a tarp. Sailing with jib and mizzen only might be an interesting option too.
This boat is really too skinning to be a good choice for sailing. But, it is what I have right now. I can still row it and sail it while building the mizzen and sewing the sail. I would really like a beamier boat for sailing but I would like to enjoy not having so many boats for a while. I think that this winter I may take on building a real sailing boat in the under 15 foot range. For now I will just try this and see how it goes.
It is all just messing about.
Thursday, May 21, 2015
Main's done
I got the main all put together and it came out pretty good, I think. I hand stitched the new patches and used aluminum pop rivets for the head board (I reused the old head board) and then pounded in a grommet for the halyard to attach to.
I did have to put 4 of the sail slides back on but I used 3 of the old ones and one new one I had lying around. I put in on the mast, as the mast is by the shop on saw horses and it seems to fit just fine.
Now on to the jib that has a torn out clew. I think I will add a patch and then a roped grommet for the sheets to tie to.
Memorial day is this coming weekend, unofficial boat season beginning. I have no intention of being on the water this weekend because it is usually madness. This also means I am in no rush to get these projects done other than needing to move on to others in the shop, oh yah, and I'd like to go sailing again someday.
 |
| Re-cut. shorter, stronger.... and hand stitched |
Now on to the jib that has a torn out clew. I think I will add a patch and then a roped grommet for the sheets to tie to.
Memorial day is this coming weekend, unofficial boat season beginning. I have no intention of being on the water this weekend because it is usually madness. This also means I am in no rush to get these projects done other than needing to move on to others in the shop, oh yah, and I'd like to go sailing again someday.
Monday, May 11, 2015
"New" Standing rigging
My new standing rigging is finished! After much research, and a bit of stepping back to look at the big picture, I decided to go with the "nico-press" type of fittings because it was inexpensive, I could to the work myself, I didn't need expensive new tools or machines, and I could reuse a bit of the material I already had. I fully realize that many might be critical of the use of this type of fitting, and I might be to, if I were setting up a boat bound for open water or even strong weather, but in this case the boat is to be used for recreational, fair weather sailing, and having "made" the rig myself, I will be more mindful, and aware of the conditions of both the rig and the weather.
Had I been using this rig a year ago, I might have been more conservative about what I put the boat thru, decided to quit sooner, or not gone out at all, and saved my self the experience of being very, very cold and wet. (on the good side, I now know what that is like. Ignorance can breed fear, and knowledge allows for better judgement, I hope)
Some info on this rigging technique:
-1x19 S.S. doesn't want to bend the short radius of the thimbles. It seems that the sharp bend may compromise some of the strength of the rig.
-1x19 S.S. requires 2 copper sleeves, each swaged 3 times along their length.
-I made sure that the sleeves did not actually touch the thimble, or each other. I did this to promote a full compression of each swage.
-The end of the SS wire stuck out of the lower swage, but was covered by the heat shrink tubing. Before the tubing was applied the entire fitting was slathered in anhydrous Lanolin for protection.
-I used a swaging tool that uses 2 bolts, tightened down to compress the copper sleeves. This tool was the least expensive(a priority in this boat), smallest (so that in the future it can be kept on board my larger boat for emergency rigging), and it was simple.
- I checked the swages with a micro meter to see if they fell in the specs that I found on a forum thread about home built airplanes and this type of rigging. the tool was pretty consistent with the thickness of the finished swage and that dimension collaborated with the aviation specs.
I believe that Brian Toss mentioned that most of the boats he'd seen rigged in this way were in the UK. He didn't recommend these fittings very highly and seemed to think they were the wrong "tool for the job". I wouldn't disagree with him ultimately, but, I think that they will serve fine in this application. Most of the negative comments I found on the forums about pressed copper sleeves seemed to be about the way the finished fitting looked. I actually like the work boat kind of look they have. It is even more attractive because the look reflects that I did the work myself.
Using this tool with these parts required really taking my time setting up and making each swage, three for each sleeve, two sleeves for each eye, two eyes per stay, six stays, plus a few practice sleeves. I have to enjoy each moment of the work or I will rush to be done and botch the job.
Now on to recutting the sails.
 |
| SS thimble, 2-Swaged copper sleeves on lower shrouds coated with anhydrous lanolin, then covered in shrink wrap tubing |
-1x19 S.S. doesn't want to bend the short radius of the thimbles. It seems that the sharp bend may compromise some of the strength of the rig.
-1x19 S.S. requires 2 copper sleeves, each swaged 3 times along their length.
-I made sure that the sleeves did not actually touch the thimble, or each other. I did this to promote a full compression of each swage.
-The end of the SS wire stuck out of the lower swage, but was covered by the heat shrink tubing. Before the tubing was applied the entire fitting was slathered in anhydrous Lanolin for protection.
-I used a swaging tool that uses 2 bolts, tightened down to compress the copper sleeves. This tool was the least expensive(a priority in this boat), smallest (so that in the future it can be kept on board my larger boat for emergency rigging), and it was simple.
- I checked the swages with a micro meter to see if they fell in the specs that I found on a forum thread about home built airplanes and this type of rigging. the tool was pretty consistent with the thickness of the finished swage and that dimension collaborated with the aviation specs.
I believe that Brian Toss mentioned that most of the boats he'd seen rigged in this way were in the UK. He didn't recommend these fittings very highly and seemed to think they were the wrong "tool for the job". I wouldn't disagree with him ultimately, but, I think that they will serve fine in this application. Most of the negative comments I found on the forums about pressed copper sleeves seemed to be about the way the finished fitting looked. I actually like the work boat kind of look they have. It is even more attractive because the look reflects that I did the work myself.
Using this tool with these parts required really taking my time setting up and making each swage, three for each sleeve, two sleeves for each eye, two eyes per stay, six stays, plus a few practice sleeves. I have to enjoy each moment of the work or I will rush to be done and botch the job.
Now on to recutting the sails.
Monday, August 4, 2014
Sailing the new rig
We took the new rig out on Friday and it all seems to be working as expected. The smaller sail and sprit are much easier to handle and seem more appropriate for the boat. The rudder tends to float to one side or the other if left to it's own, but I figured that would be the case. Having a rudder does make the whole affair a little more complicated but when out for longer sails will be nice. The fore and aft tiller stick works just fine.
Thursday, July 31, 2014
New Mainsail and sprit
No photo editing, it's done and smaller. Now the sprit and mast fit in the bottom of the boat, but with one hatch open.
 |
| The new reduced rig! |
Friday, July 25, 2014
Skiff work
Today I cut down the sprit yard, got the mainsail set up for stitching, and installed a "keeper" for the rudder, to keep it from floating out of it's gudgeons. I made the rudder lock, I guess I could call it, out of some yellow pine and a bronze screw. It is a teardrop shape and hangs from the transom just above the upper pintle. It can be swung out of the way so that the rudder can be placed or removed but hangs in a way to keep it in place the rest of the time. Simple. I may start stitching up the sail tonight, shouldn't take long to do the seam but the patches and attachment points still have to be worked out.
Friday, July 11, 2014
Rudder mounted on skiff!
Today I got the pintles on the rudder and got the rudder mounted on the skiff. I am using a push~pull stick rather than a tiller. This makes more sense for a small boat.
I got this idea from Ian Oughtred's Caldonia Yawl. I have seen other vessels use it too. The stick allows movement fore and aft to balance the boat, and keeps one from having to duck under the tiller or lift it over your head.
 The "arm" is slotted thru a square hole and a peg keeps it in place. I used a chisel to cut the square hole in the tiller. I may change out the peg for a wedge. A piece of line attaches the arm to the stick and serves as a universal joint. Simple, cheap, affective, and it even looks kind of right. I fashioned the gudgeons out of scrap stainless steel plate, but I bought the pintles. The pintles are set in a dado. I hope to paint the bottom of the rudder white, put a red stripe above the water line and varnish the upper section and the steering arm and stick. I also need to put a "keeper" or lock on the top of the pintle to keep the rudder from floating up. I have seen simple metal tabs that pivot on a screw but I might consider a piece of shock cord, in case of grounding so as not to rip apart any of the wood or fasteners. I will probably build a longer push-pull stick later. This one is about 5 feet long and a 7'-6" one would fit stored in the cockpit and might allow for steering while working at the mast.
I got to use my egg beater drill and my brace to drill the holes. I haven't been using the brace as I have not bits for it, but the set of Milwaukee drill bits I have are 3 or 4 sided so they lock in the chuck on the brace. It was very nice and quite and more controllable than the screw gun or electric drill.
I am not sure how well the cedar will due for a rudder. It is light weight and that is why I am using it, as well as it's being able to handle the moisture. I will have to watch the stress points, at the pintles and at the steering arm.
 |
| tiller is cedar and the push pull stick is yellow pine |
I got to use my egg beater drill and my brace to drill the holes. I haven't been using the brace as I have not bits for it, but the set of Milwaukee drill bits I have are 3 or 4 sided so they lock in the chuck on the brace. It was very nice and quite and more controllable than the screw gun or electric drill.
I am not sure how well the cedar will due for a rudder. It is light weight and that is why I am using it, as well as it's being able to handle the moisture. I will have to watch the stress points, at the pintles and at the steering arm.
Friday, April 11, 2014
extremely trailer friendly mast?
 |
| broken mast and boom from Venture 21 |
With Jean-du-Sud
I think I would prefer a mast of about 20 or 21 feet anyway. It would be easier to raise and lower when launching and the boat is pretty fast with this sail plan already. For recreational sailing the loss of sail area doesn't bother me at all. I have been sailing with a used main from a smaller boat anyway.
At this point it is all just smoke because until I get the boat back home I am not sure that I will be keeping it.
Monday, November 25, 2013
Sailing past the Bouy
So far this season we've been in the water six weeks and we've sailed six times. Right on target. We have a batch of nasty weather coming up so we may ruin our average soon. We'll see.
Thursday, August 1, 2013

sailing QTx skiff
 |
| Sprit rig skiff no rudder no daggerboard steering by the mainsheet and bodyweight! dead simple |
Tuesday, July 30, 2013

Sunday, April 28, 2013
She sails
Today I took WHISP out to the lake and tested her sailing rig. She sails. Success and surprise. The surprise is that she sails without the use of any added underwater parts (centerboard or rudder) and that she even sails to windward this way.
At first I was using the oars for steering, that was awkward but somewhat affective. While going forward to take up on the snotter for the sprit yard I noticed that my body weight moving affected the track of the boat. I had the mainsheet made fast to the cleat and moving forward caused the boat to head up into the wind. Moving aft caused it to fall off. I also noticed that leaning to leeward could add to the affect of heading up and leaning to windward caused us to fall off the wind.
I also think that the external chine has a large affect on reducing the boats leeway.
I was able to tack the boat thru the wind twice, simply by moving all the way forward and to leeward until the boat came about, then moving back aft as the sail filled on the opposite tack. I was really amazed. I did miss a tack completely once, but used the oars, which were at the ready, to easily move the boat around.
The nicest thing about this is the freedom of clutter in the boat and the simplicity. No center/dagger board, or leeboard to deal with. No tiller. I was able to lie prone with my head on a boat cushion and the mainsheet in my hand and by simply moving my feet from one side of the boat to the other and leaning my body a tiny bit, was able to steer a coarse. Another thing is I had no worries about catching the under body on a rock.
I hope to post some pics or vids of the boat underway in the next week.
I think I will build a rudder for the boat in case of being out in stronger winds and needing to use my body weight more robustly. I may also try a leeboard as well. I can always not use them if I find I don't need them.
I am very happy that the sail worked out. The shape of it was pretty good for making it out of a reclaimed old jib from my 27 footer. The sprit rig seemed much simpler to use than the lug rig I had used on a dink I had set up a year or so ago.
It is nice to be sailing in one of my own boats once again.
At first I was using the oars for steering, that was awkward but somewhat affective. While going forward to take up on the snotter for the sprit yard I noticed that my body weight moving affected the track of the boat. I had the mainsheet made fast to the cleat and moving forward caused the boat to head up into the wind. Moving aft caused it to fall off. I also noticed that leaning to leeward could add to the affect of heading up and leaning to windward caused us to fall off the wind.
I also think that the external chine has a large affect on reducing the boats leeway.
I was able to tack the boat thru the wind twice, simply by moving all the way forward and to leeward until the boat came about, then moving back aft as the sail filled on the opposite tack. I was really amazed. I did miss a tack completely once, but used the oars, which were at the ready, to easily move the boat around.
The nicest thing about this is the freedom of clutter in the boat and the simplicity. No center/dagger board, or leeboard to deal with. No tiller. I was able to lie prone with my head on a boat cushion and the mainsheet in my hand and by simply moving my feet from one side of the boat to the other and leaning my body a tiny bit, was able to steer a coarse. Another thing is I had no worries about catching the under body on a rock.
I hope to post some pics or vids of the boat underway in the next week.
I think I will build a rudder for the boat in case of being out in stronger winds and needing to use my body weight more robustly. I may also try a leeboard as well. I can always not use them if I find I don't need them.
I am very happy that the sail worked out. The shape of it was pretty good for making it out of a reclaimed old jib from my 27 footer. The sprit rig seemed much simpler to use than the lug rig I had used on a dink I had set up a year or so ago.
It is nice to be sailing in one of my own boats once again.
Subscribe to:
Posts (Atom)