Pages

Tuesday, March 19, 2013

All the parts are there.

All the structural work is done.  The floors ended up to fit best sitting directly on the ribs.  Great that's less work than making a thwart or elevating the floors to double as a seat.
All parts assembled!
 Now the finish sanding and shaping of things and then masking and paint and varnish.
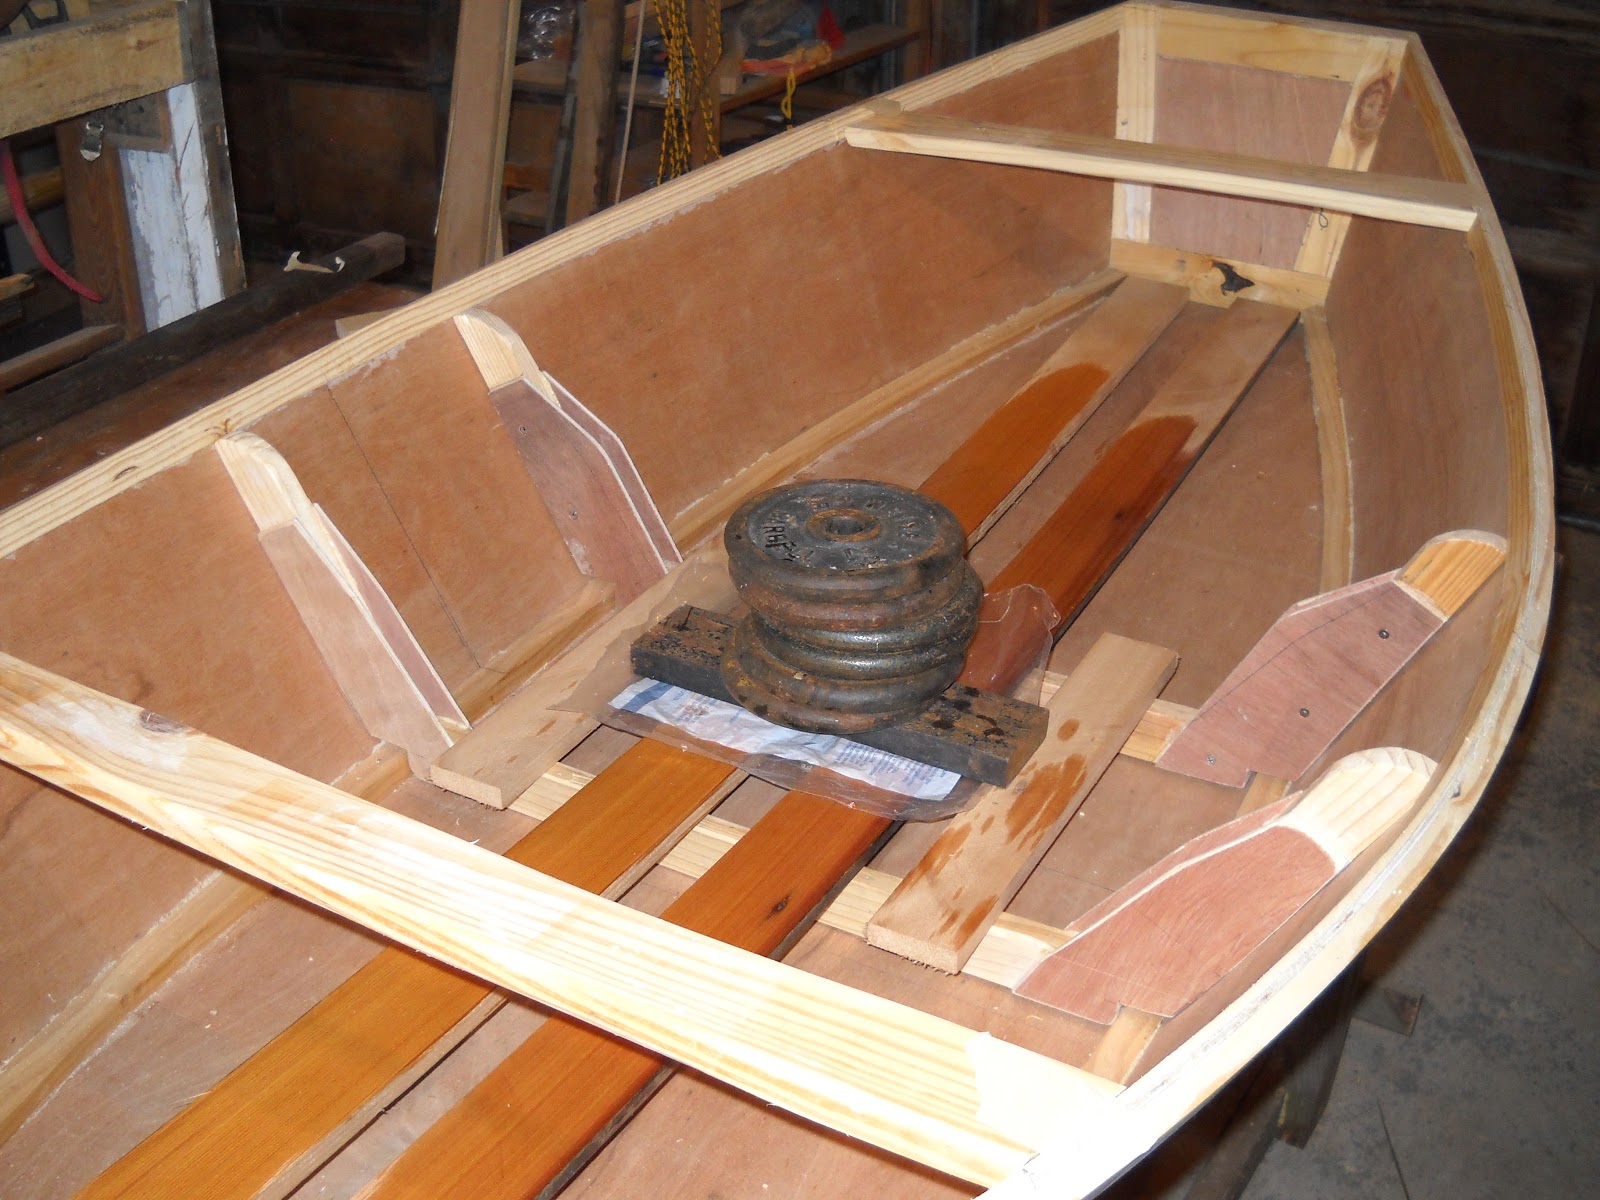
The floors are from scrap cedar and will be varnished
so that sliding fore and aft to balance the boat will
be easy

Looking aft.  The ribs are a bit clumsy but they do a lot structurally.

Friday, March 15, 2013

Pram underbody

I used some of the remaining yellow pine that was scavenged from a packing crate to mill both of the bilge skids and the skeg.  The skeg is 3/4 in wide and the skids are 1"wide x 3/4"thick.

bilge skids glueing up
 I chose to use Gorilla glue and ss screws to attach the underbody parts.  I am not so sure that the Gorilla glue will bond completely with the epoxy, but that is partly why I am using it.  I'd like to be able to remove these parts when the need replacing.  The Gorilla glue foams up nicely to fill in some of the gaps, the foam isn't structural but it will help to mate the two surfaces and create a watertight gasket of a sort.
skeg glued up.
I didn't use any backing plates on the inside of the pram, the way I did on the skiff.  I think that the fiberglass and the plywood together are enough, but if that proves to be untrue I can always add them.

I cut the bilge skids much longer than needed so as to give more leverage to the weights as I bent them to shape.  I made small cuts on the underside, about an eighth of an inch, at the ends so that when I cut them to length I won't have to cut all the way down to the fiberglass!

underbody parts all attached.
 Now after the glue dries I can sand away the excess and use some caulk to create a nice fillet around the edges before painting.

Tuesday, March 12, 2013

Armored bottom.

It is really amazing how much the size of the boat effects the time it takes to do each of the projects.  I think any one who needs to be quickly gratified, but wants to build a boat, two things I think are mutually exclusive, would be best to start with the smallest boat possible.  Progress on any one part of the project happens much faster.
masked, glassed and curing.  the armor is now on.
 The warm spell was fortunate for me in the timing of it.  By day after tomorrow the temps will be back in the 30's during the day and below freezing at night.


A little cover with a heater on the floor underneath
to keep it warm overnight.
 The epoxy is drying, tacky, and kicking enough that I trimmed off the fiberglass to the a neat edge and pulled the masking tape off.

I lit the wood stove and ran the small ceramic space heater (electric) under the work table and it felt downright balmy in there but the thermometer read only 60f.  That's the warmest it's been in there for months.

I only have the "slow" hardener for the epoxy and the min. temp
is, you guessed it 60'f.  I think its much warmer under the tarp.

Glued and screwed!

Now for the finish shaping and then varnish.

After
Looks crooked in the picture doesn't it?  It's just the angle
Before.
I could have left it like this, but why not muck it all up!


Monday, March 11, 2013

Shaping the sprit yard

Work on the skiff continues.  The sailing rig needs to be dealt with.  So first is the sprit yard.

12 feet by 1-5/8th inch square.  This is made of 4 pieces laminated together.

Instead of using the table saw to make the 4 side spar into and 8 side spar I decided to
just use the small block plane and take my time and enjoy the
accumulation of shavings, while listening to music.

Lots of shavings, but I am not done.

I found a piece of Mahogany, I think, and am using it to make a horn for the mast that
will be a stop the "snotter " for the sprit yard.  I think the contrasting dark
wood will look nice. 

8 sides is enough for this spar.  Now I just need to sureform and sand it down.
I will shape the ends to take the rigging points.

The 2 spars.  I may add a 3rd, a boom, if the loose footed rig proves lacking.
I would like to make a chock of some sort so that when the spars are lying down in the boat they can be secured.  Neither spar extends past the bow when lying in the bottom of the boat.  That is kind of nice.
I had to rework the mast partner to accommodate the smaller
diameter of the mast.  Now the mast will be captured
in the partner and I can use a wedge or lashings to snug it all up.
First, I have to finish shaping, after the glue dries.  Might not even be able to
see the joint when it is all done.  Maybe.
Having a boat small enough to fit in the shop, and having a shop to put a boat in is really great.  The winter months can be spent just messing about leisurely upgrading and maintaining, and dreaming about the Spring time.  Can't really do this with a big boat, unless you happen to have a BIG shop.  The other thing about small boats is the changes I am making right now cost me next to nothing.  The wood is scrap, still stuff from a packing crate I scavenged.

Glass, maybe.

With the warm temps I am considering glassing the bottom of the pram tomorrow.
With a line marked on the sides I can lay out the fiberglass and trim it to shape.
I don't actually have one piece big enough to do the entire bottom, but in the interest of using up scrap I can do it in 3 pieces and then at a 3 inch tape along the chine.
The glass is really just to armor the bottom which is pretty thin and delicate.
With a plastic tarp to cover and a small heater going the boat should cure overnight.

Thursday, March 7, 2013

Snowy out, fire in

The snowy weather makes for good work days in the shop.  Light the wood stove, turn on the radio, make a cup of coffee and the day just zooms by.  

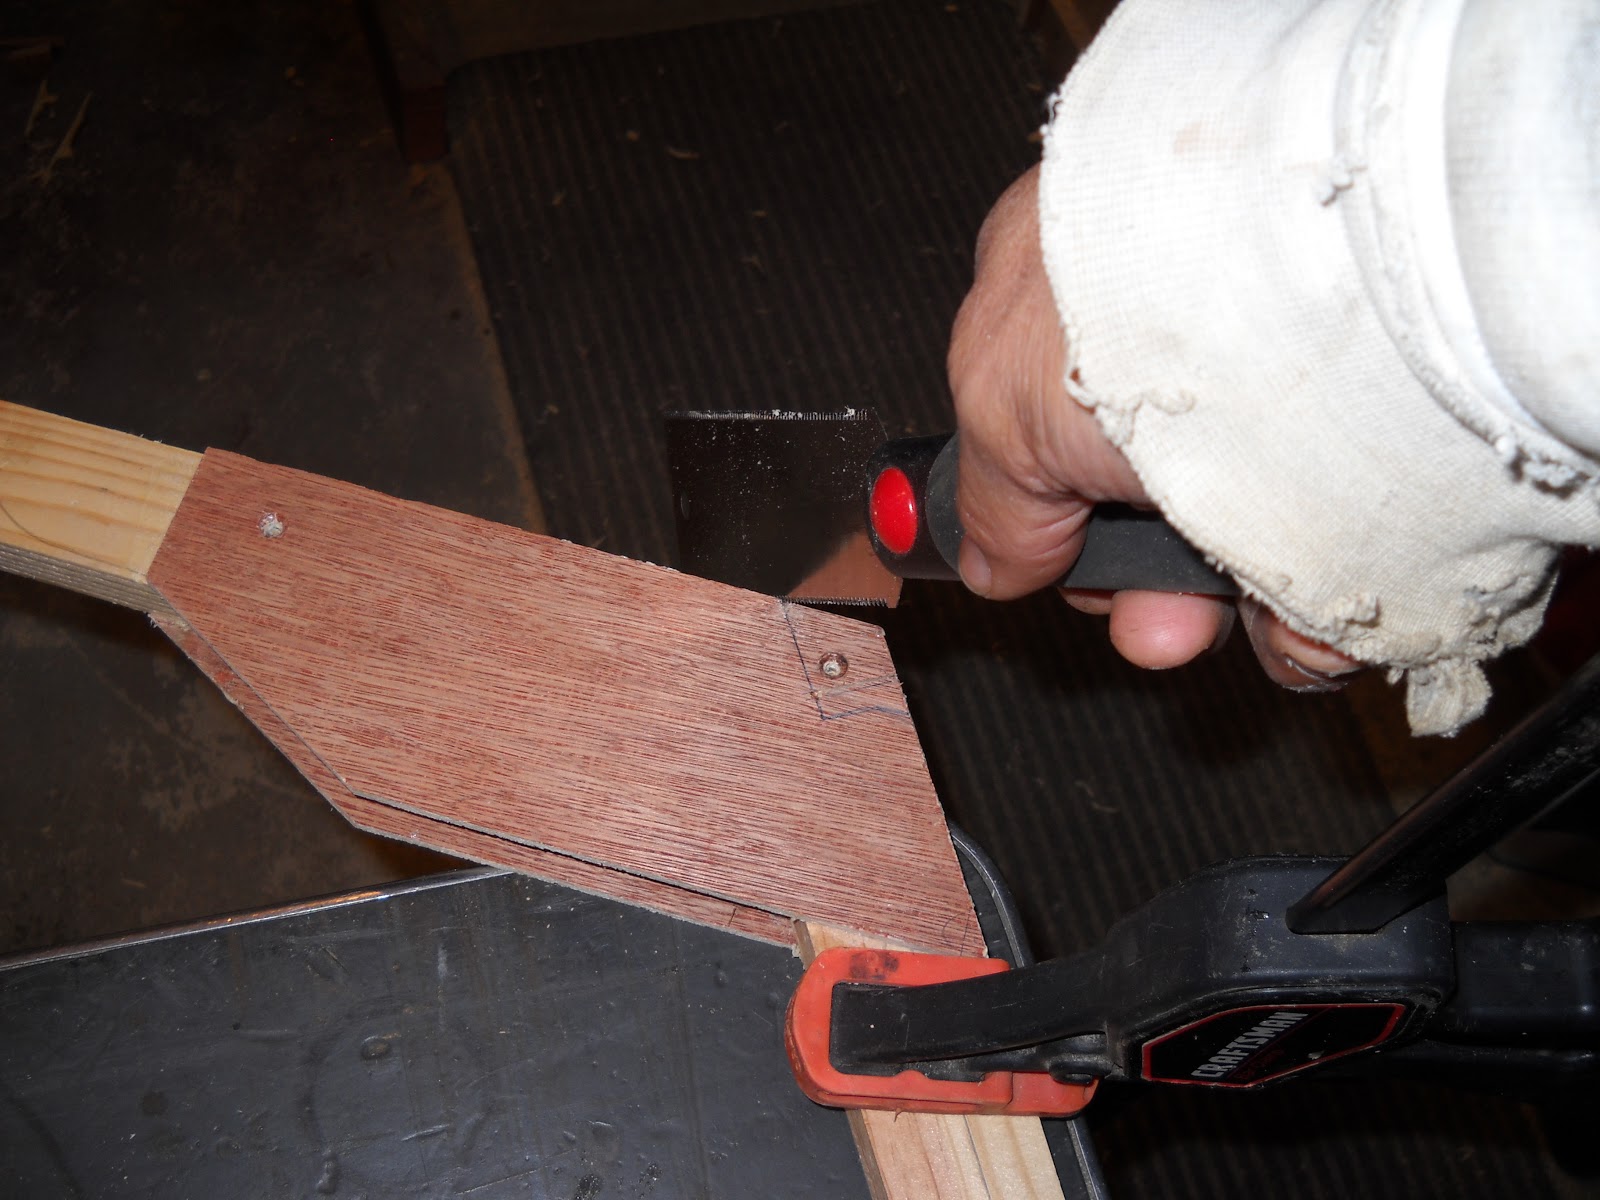
The japanese pull saw is the tool I use most.

Here the second rib and the two braces for the gunwales can be seen


This is the most used power tool.  The ability to cut angle and bevel at the same time is so amazing!!


Cedar decking scrap will become the floors/thwart that runs fore and aft.  It is wet and being weighted to bend it into shape.

The cedar floor planks are 5/8 ths. inch thick by 3 inches wide, just thick enough to be
supportive but thin enough to bend to the curve of the bottom.


the cross braces on the gunwale are 3" wide by 3/4" thick and will be shaped to about 2"
in the middle.

the floors will bare on the chines and the ribs.

The plywood plates on the ribs still need to be trimmed down

Monday, March 4, 2013

It's a boat!


With the gunwales on and the bow and stern trimmed to size the final lines of the boat can be seen and I am pretty happy with it so far.  The real test will be when it gets wet and I try to row and paddle it.

gunwales on! outboard trim on transoms gluing up.
I still have to put in the cross braces, one aft and one forward.  I think they will help stiffen the hull sides as well as make carrying the boat a bit easier, like a canoe.  Although I have planned to put in a fore and aft running thwart, I am considering one position for rowing, that would run across the boat.


Now the pram shape is easy to see.
It would be a removable thwart on a set of cleats glued to the sides.  I could make it go forward of the midship rib frame for traditional rowing or go aft of the frame for a paddling position.  I think the 2 different positions would help trim the boat.

The one permanent frame is in place but not fastened yet.
Over all I am pleased with the shape and size of the boat, considering it is a "one sheet" of plywood boat.  I am a bit confused as to why none of the boats I found while researching this idea had any kind of shape with rocker or flare and most just looked like open boxes.   There was one guy from Austria who did amazing boats with one sheet, multi-chined, and very well constructed.  I think he used a cad program to get the most out of the one sheet and he did have to scarf some pieces together, something I wanted to avoid for some reason.

Quite a bit of rocker.  Can't wait to see how it will work on the water!
One bonus that I will have if this boat works very well at all is that it is the right size to work as a tender for my 27 foot cruising sailboat and be stored on deck and not block up the path to work on sails.  That would be really great.

Friday, March 1, 2013

Gunwales!!

I got the inwales on and now I am working on the gunwales.
clamps, lots of clamps.  It seems the boat will turn out to be 7'6" length over all.
 Making things work with what's put in front of me, I have decided that the width of the gunwales will be what the stock I have is, minus the width of the table saw blade.  I cut the outwale down to 1/2 inch, so as to make it bendable, and that left 3/8ths for the inwale.
I can only glue up a side at a time as I need more clamps
I haven't used any fasteners on the gunwale, just glue  I may add fasteners from the inside eventually.
the bow transom is glued in and waits for finish trimming down to size. The large block of wood at the top is to accommodate a cleat or painter.
The internal chines ended up being not so tight a fit, as in, I didn't do a very good job with them.  I was in a weird mood the day I had the glue in my hand.  I should have walked away and come back another time.  But, I think it will all work out in the end.

Prepping for Spring sailing

Getting the mast down to about 2"
Working the mast down to a more reasonable dimension by planing and sanding and planing, and planing.