Pages

Monday, April 30, 2012

"WHISP"

Add caption


While doing what boat builders are said to do a lot of, just sitting in a comfortable chair looking at the boat and mulling over ideas, lines and why one is so obsessed with boats, I noticed that I was bothered by something in the line the risers followed.  After taking some measurements I decided to adjust the riser so it follow the sheer line of the boat at the gunwale, instead of at the bottom chine as it had.  This helped make things seem pleasing when I looked at the boat.

The next thing I noticed was that the boat now had the same basic color pattern as a previous boat I had owned.  It was a 17 footer that I got for free from somebody on Long Island who wanted it out of his driveway.  It was a project boat and that was great as it allowed me to do the project with my son, who was very young at the time and hardly interested in work, but tolerated sailing well as he knew I liked it.  He was a good sailor, though he seemed only mildly interested in it.  "Whisper" was the name of this sloop rigged centerboard day sailor that was built by the Sailstar Corporation, if I remember correctly.  So while sitting and staring at this new little boat I saw the resemblance and decided on it's name.  As a diminutive boat to Whisper so goes the name, "WHISP".


Having recognized the relationship of the two boats I am even more inclined to make a sailing rig for "Whisp".


Should my son ever desire, "Whisp" will be here for him, and until then I hope to put her to good use.

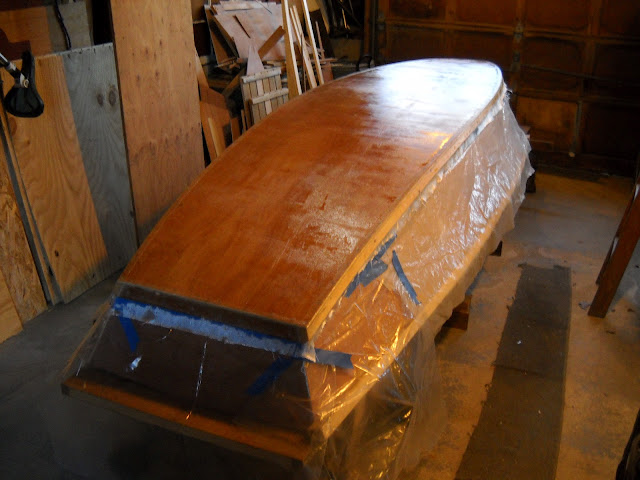
The decks are attached, screwed and glued but still needing to be caulked at the seam and a final coat of paint(maybe with nonskid),  and the bulkheads are getting their finish paint today.

I am very tempted to put her in the water just to see how she sits, warm weather gets me anxious, but I would be better off to wait I am sure.

Friday, April 27, 2012

Interior work

 After flipping the boat back onto it's bottom (it's gotten a little heavier, pain?)  I caulked the joint between the chine and the sides.
chine to hull joint ready for paint.
I have painted the undersides of the decking because it will be to hard to get in there after they are attached and they need paint to preserve them a little.  I left an unpainted border for the glue to adhere to when I do attach them.

Floatable now, patience.
The boat seems so different to me with paint on it.
I am now a the point where I can attach the decks, but I think I want to put on one coat of finish paint on them before I do.  They are already primed.
I still haven't decided on how I am going to attach the floors so that they don't come out if the boat is turned over, but are easily removed for cleaning.

The boat is probably going to way at least 15 pounds more than I would really like.  Everything adds up.  It is strange when I think about how much weight the paint seems to have added, then I think about picking up a can of paint and how heavy it is.  I would think a lot of the weight of a paint can comes in the form of moisture that will eventually evaporate when applied to a surface.

Still to do:
   attach decks & bulkheads
   locking mechanism for hatches
   locking mechanism for floors
   Coamings for forward and aft bulkheads
   Taffrail/sculling notch
   thwarts
   oarlock sockets
   Varnish

After launch I will consider the sailing rig.
I guess I really need to start thinking about a name.

Saturday, April 21, 2012

Colors!

The finish coats of color have been applied!!!  It looks so different to me now.  I am not sure I like it as much without the wood grain.

Bottom glossy white, sides glossy red.  First coat of each
 I got latex interior/exterior house paint for the finish coats from the local hardware store.  I have used marine paints on my other boats before and it has a harder surface when cured, but it also has a higher price tag and is a little bit more finicky to apply, maybe.

The white went on easy enough, but the red needed to be thinned about halfway thru the application.  I hope to use a roller on the final coat.  I enjoyed using the brush for the first coats, as it made the cutting in easier with no need to mask, and it made me slow down and enjoy the process.  I think it also kept me from being to "precious" about the whole affair, after all it is a boat and I tend to use my boats very hard. Work boat finish is just fine, even for a yacht.  I think 2 coats of red paint will do.
Shiny bottom! That won't las long.
I will varnish the stem, gunwales, transom on the outside, the ribs, risers and bulkheads on the interior.

Monday, April 16, 2012

Costs

I don't think I mentioned that the price of parts ordered from Duckworks, clothe for putting the fiberglass on the bottom and the oar locks of the skiff instantly doubled the total cost of the boat.  Now, buying paint, I think it will raise it that same amount again.

I spent about $70 bucks on fiberglass clothe and bronze oar locks and sockets from Duckworks.

Today I spent about $50 on paint from the local hardware store.  I already had the primer so that cost was avoided.  I am sure I will need a little more paint before launch.  I have varnish, I think, so I hope to avoid that expense.

The thing that seems funny is that it is already a boat, it will float, but it won't last as long or look as pleasing until this stuff gets put on.  It is the preservation and vanity that cost the most.  Very interesting.

I guess it could be worse.
Now that's a paint job!

Friday, April 13, 2012

Primed.

With the warm weather I rolled the skiff outside and put on a layer of primer (or 2) on the inside.  I found some Acrylic primer in the shop and am using this.  2 coats.  I will look for a very glossy house paint for the interior.  I thing the natural cedar floors will keep it from being to bright.

It is a big step as this means that the construction part of the boat is basically over and now we are on the finishing process.
 I will still put an epoxy fillet and fiberglass tab on the keel to give it a little more integrity.
 The boat is definitely gained some weight with the addition of the keel and the glass.
 A little trolley, kayak wheelies, is now the most sensible way of moving the skiff.
 I need to decide on the finish of the side panels.  The interior will be white or varnished or oiled.  I'd like to keep the gunwales varnished or oiled as well as the stem and the transom but I am not sure about the topsides.  I am considering red???!!! with a white bottom.  I think I am inspired by the Colin Archer lifeboats.  I'd like it not to be to precious and a little bit fun.  So, maybe red.
It is starting to feel a bit strange and exciting.  Maybe a month away from launching.

Wednesday, April 4, 2012

Goop & Glass

The warm spell has allowed me to do the fiberglassing of the bottom.  It was such a nice day out, what a shame to spend it spreading out this goop, but then, we are one step closer to being out rowing on nice days like this.

6oz. glass clothe and a layer of glass tape on the chine.
 So, I got the fiberglass from Duckworks and I have plenty left over.  The advantage to the temps being so cool is that the epoxy doesn't kick to soon, a longer working time.
bottom and chines "armored".
Once I laid out the clothe and cut it to size, plus a few inches, I rolled it up and I spread a coat of epoxy on the bare wood of the bottom.  Then I rolled the clothe back out over the bottom and smoothed it out, wet it out with more epoxy being sure to get all the glass saturated, but no more than that.
I was working fast, as most of my experience working with epoxy has been in warmer weather and time is usually an issue.  Once I got to the added layer of tape for the chine I realized that I had time to make sure that everything was as it should be.
The one thing that is yet to be done is the trimming of the extra glass.  Usually I'd do this when the epoxy is half kicked, firm but workable.  That may not happen until much later tonight, we'll see.